Selling spaces & more
A word of caution about the "Sold with burial" status
Selling a space back to the cemetery
Changing the color of spaces on the map
Sell a space

Follow these steps to sell a space:
- First, select the space so its information opens in the right-hand flyout. If you're not sure how to do that, read our spaces list page.
- Change the status to "Sold".
- The "Owner" field is required; add the owner's name by searching for an existing customer record or creating a new one. See the page about customer records to learn more.
- All other fields are optional. If the space is owned by multiple people, you can add them as co-owners.
- Click "Update" to proceed to the next step.
- A popup will appear titled "Save ownership data to the following". This is the multi-space picker modal. Use this popup to save the information you just entered to one or multiple spaces simultaneously.
- By default, information will save only to the one space you initially opened.
- To save information to multiple spaces, explore the options below the header "A selection of spaces from". You can choose multiple spaces by block or lot, or use the space picker option to select spaces from anywhere in the cemetery.
- Click "Save" in the multi-space picker modal.
- You did it!
🎬Watch a video! Selling spaces & more
What if I don't know who owns this space?
That's okay! We recommend you use a customer record with a first name of "Unknown" and a last name of "Unknown" and use that as the owner. If you learn later who owns the space, do not change the name of the Unknown Unknown customer record, make a new one and update the space's owner.
A word of caution about the "Sold with burial" status
When entering data, we recommend you do not use the "Sold with burial" status, even if you know a burial is present on the space. When you add a burial to a space, CIMS will automatically change a space's status from "Sold" to "Sold with burial". This keeps your count of spaces accurate, so that you know exactly how many spaces are sold and how many sold spaces have burials.
Reserve a space

If a potential customer wants to reserve a space now and pay for it later, use the "Reserved" space status. Not all cemeteries allow customers to reserve spaces, and those that do often have a limited amount of time before the space needs to be paid for.
To reserve a space:
- Change the space status to "Reserved".
- The "Reserved date" and "For" fields are required.
- All other fields are optional; we recommend saving information like who reserved the space and the reservation agent (the cemetery employee who processed this reservation request).
- Click "Update" to proceed to the next step.
- Exactly like the above, the multi-space picker modal will appear. Use it to update the information for one or multiple spaces simultaneously. Click "Save" when you have made your choice.
By default, reserved spaces are pink. Use the Layers popup to change your space colors.
Restrict a space

Mark a space as restricted when it cannot be sold. Common examples of reasons to restrict a space include a tree being on the space, a road encroaching on the space, drainage problems, or insufficient space for a burial.
To restrict a space:
- Change the space status to "Restricted".
- The "Restricted date", "Restricted by" and "Restricted reason" fields are required.
- If you do not see the reason you need to restrict the space for listed, click the navy blue plus button to bring up the full list of restricted options in a separate popup. Use this popup to add a new restricted reason.
- All other fields are optional; you might add some remarks with more details about why the space was restricted.
- Click "Update" to proceed to the next step.
- Exactly like the above, the multi-space picker modal will appear. Use it to update the information for one or multiple spaces simultaneously. Click "Save" when you have made your choice.
By default, restricted spaces are salmon-orange. Use the Layers popup to change your space colors.
Transferring space ownership
Did a space legally pass from one generation to the next? Did the owner sell the space to a different owner? You'll want to transfer ownership.
To transfer ownership of a space currently belonging to customer A to customer B:
- Navigate to that space. On the "Ownership" tab, click the orange minus button next to the owner's name to clear out the name of customer A.
- Do the same for any co-owners; click the orange minus button next to their name.
- Search by last name to fill in the name of customer B, or create a new customer record for them.
- Repeat this process for any co-owners.
- Click "Update" and choose to update either this one space, or multiple.
- A popup will appear asking you to confirm the change in ownership. Click "Continue".
- A second popup will ask if you want to record the change in ownership in the ownership history. Click "Yes".
- The ownership has now been changed from customer A to customer B. The historical ownership information can be found by clicking on the navy "Owner history" button on the Ownership tab. There you will find customer A's record of previous ownership. Furthermore, when using the customer search to find customer A, or when looking at their customer record, they will show as having been a previous owner.
For more information about ownership history, see the owner history section of this documentation.
Selling a space back to the cemetery
If an owner forfeits a space, or sells it back to the cemetery, follow these steps to make a "Sold" space "Available" again:
- If the space has a deed, remove it. See our documentation on deleting deeds.
- Next, in the "Ownership" tab, change the status to "Available". Click "Update" to proceed to the next step.
- A popup will appear titled "Save ownership data to the following". This is the multi-space picker modal. Use this popup to save the information you just entered to one or multiple spaces simultaneously.
- By default, information will save only to the one space you initially opened.
- To save information to multiple spaces, explore the options below the header "A selection of spaces from". You can choose multiple spaces by block or lot, or use the space picker option to select spaces from anywhere in the cemetery.
- Choose wisely! Because we are setting a sold space back to being available, you may accidentally lose ownership information for other spaces if you choose to save information to multiple spaces.
- Click "Save" in the multi-space picker modal.
- A popup will appear asking you to confirm this change in status and ownership. Click "Continue".
- Another popup will appear asking if you want to record the change in ownership in the ownership history. In the case of a genuine transfer of ownership, click "Yes". This saves the information as ownership history. Learn more below, in the owner history section of this documentation. If this was a clerical error and the individual(s) never owned this space, click "No".
- That's it! The space is now available and has ownership history, if you chose to add it.
Actually, no one ever owned this space, I made a mistake!
That's okay! You can use this same process to remove the owner information and make this space available, or restricted, or whatever it needs to be. If the ownership information actually belongs to another space, you can move the entire contents of space A to space B using the move space functionality. This happens most often in data entry when a mistake has been made and a space's information needs to be shifted over one or more spaces. See our documentation on the move space functionality.
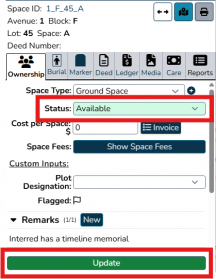
To sell a space back to a cemetery, change the status and click "Update".
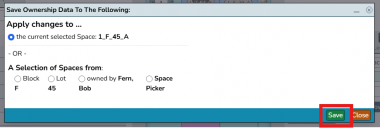
Select one or multiple spaces.
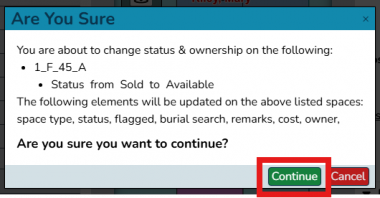
Confirm the changes you're about to make.
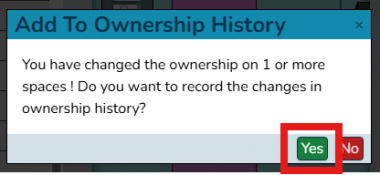
Save ownership history in the case of a transfer of ownership.


Edit a space
Did you mis-type a space's cost, or want to add more information after saving your initial data? Editing information on a space is easy! Just select the space in question so it appears in the right-hand flyout. Make any changes you need, then click "Update". Use the multi-space picker modal that appears on your screen to save these changes to one or multiple spaces - but be careful if you're changing multiple spaces! You might accidentally overwrite information.
If you are changing the owner of a space, you will be asked if you want to record ownership history. Clicking "Yes" saves the owner, any co-owners, cost and sale date in the ownership history. To view a space's ownership history, click the navy blue "Owner history" button in the Ownership tab. From here, you can add records of ownership change, edit them, and delete them. See the owner history section below.
Custom space statuses
Need a custom space status, such as "Needs research" or "Space does not exist"? Read about custom space statuses here.
Changing the color of spaces on the map
Use the Layers popup to change your space colors.
Owner history

Spaces may be purchased then transferred to a family member, or sold back to a cemetery, or the ownership may change in some other way that you may want to record. Do so using owner history.
Changing current ownership
To transfer ownership of a space currently belonging to customer A to customer B, see the transferring ownership section of this documentation.
Adding historical ownership information
Need to record the fact that a space used to be owned by a different customer?
- Navigate to the space you want to add owner history for. On the Ownership tab, scroll down and click the navy blue "Owner history" button. This will open the a popup where you can view this space's owner history, edit this history or add history.
- To add an entry to this popup, click "Add record" in the lower-right corner of the popup. Fill in the owner name, any co-owners, and any other pertinent information (sold date, cost, etc.). We always recommend adding in helpful remarks explaining clearly what happened.
- Click the "Edit" button to the left of an entry to edit it. Likewise, "Delete" will permanently delete the entry from your database.
