Miscellaneous functions
Reminders

Reminders help you and your fellow cemetery employees keep track of tasks, such as checking on specific spaces or following up with a customer. You can use them for anything you need to remember.
If your cemetery has reminders, they will appear when you first log in to CIMS or when you refresh the webpage, unless you have chosen to hide them. Alternately, click "Utilities" in the top navigation bar, then "Reminders" to see a popup listing your reminders.
Reminders can be added throughout CIMS; to make a reminder for a specific space, navigate to it in CIMS, scroll down to the bottom of the Ownership tab in the right-hand flyout (if Platinum) or to the bottom of the right-hand panel (if Gold or Light). Click the navy "New reminder" button and a popup will appear. Fill out the reminder date, who the reminder is assigned to, and the text of the reminder, then click the green "Save" button in the lower-right corner of the popup. Use this same technique in the Burials tab to make a reminder for a burial, in the Markers tab for a marker reminder, and so on. To make a generic reminder, open the reminders list popup by clicking "Utilities" in the top navigation bar, then "Reminders", then the "New reminder" button in the popup that appears.
To edit a reminder, simply click on it, either from the reminders list popup or from where reminders are found throughout CIMS. Change the fields you want, then click "Save".

Disinterred burials

In the top navigation bar, click "Utilities" and choose "Disinterred burials" from the dropdown list. The disinterred list popup will appear, listing any records of disinterred persons for your cemetery. From here, click the navy "Add new" button in the lower-right corner of the popup to add a new record of disinterment. To edit a record, click the pencil icon that appears to the left of the record. Likewise, clicking the red trash can icon next to a record of disinterment will delete it from your cemetery's data.
To learn how to disinter an existing burial, consult the burials page (click here for the CIMS Gold/Light version).
Download cemetery data

The downloaded folder contains multiple files with different extensions, such as .DBF, .CPG, .SHP, and .PRJ. These files work together to store tabular data (like a database), spatial information (for mapping purposes), and other metadata. This format ensures that all aspects of your data, including tables and spatial elements, are preserved correctly. Many professional data analysis and mapping tools use this structure, making it useful for advanced processing.
To download your cemetery's data, click your cemetery's name in the top navigation bar, then "Download cemetery data" from the dropdown list. Please be patient and leave this tab open as CIMS bundles your information into a zip folder and begins the download process. For most browsers, your data will download to your computer's Downloads folder.
Move a space
If you want to move the entire contents of space A to space B, you can do so. This happens most often in data entry when a mistake has been made and a space's information needs to be shifted over one or more spaces. It is best to make sure that space B has a status of "Available" and has no data present, because all of its data will be completely overwritten.
Moving a space is a destructive function that has the potential to overwrite important data. Read all warnings carefully!
- Navigate to the space whose contents you want to move and load its information in the right-hand flyout (if Platinum) or the right-hand panel (if Gold or Light).
- Click "Utilities" in the top navigation bar, then "Move space (ownership, burials, markers, deed, etc.)".
- Your cemetery may use a term other than "Space", such as "Lot" or "Plot". In this case, the label will be slightly different and read "Move lot", etc.
- Choose the space where you want to move the original space's contents to.
- Platinum: You will see the map change to be in "Map mode: move space". Click the space where you want to move your information to.
- Gold & Light: A popup will appear asking what space you want to move your information to. Select the appropriate section, block, lot and space, then click "Move".
- A popup will appear asking you to confirm this space move. Read this popup carefully! It will explicitly warn you if you are about to overwrite an existing burial, marker, etc. If you overwrite an existing burial or marker, it will be permanently deleted from your database.
- Click "Continue" to confirm the space move.
- The contents of your space have now been moved. The original space now has a status of "Available" and no other information. You will need to load the new space in the right-hand flyout (if Platinum) or the right-hand panel (if Gold or Light) to see the information you moved.
- Platinum: Your map may take a few seconds to update. When it does, you will see that if you moved a burial or marker, it is now in the center of the new space. Read the burials documentation to learn how to move a burial shape. Likewise, read the markers documentation to learn how to move a marker shape.
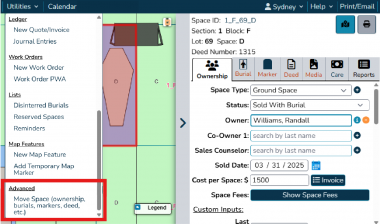
Navigate to the space whose contents you want to move and load its information in the right-hand flyout (if Platinum) or the right-hand panel (if Gold or Light). Click "Utilities" in the top navigation bar, then "Move space (ownership, burials, markers, deed, etc.)".
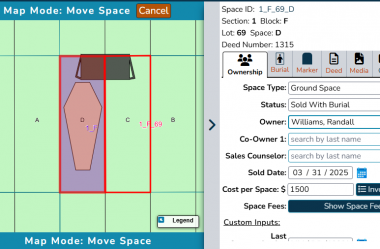
Platinum: You will see the map change to be in "Map mode: Move space". Click the space where you want to move your information to.
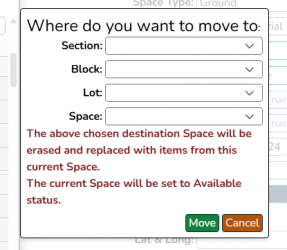
Gold & Light: A popup will appear asking what space you want to move your information to. Select the appropriate section, block, lot and space, then click "Move".
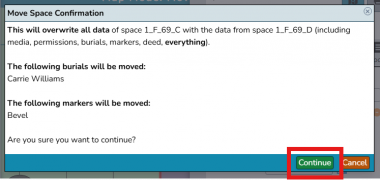
A popup will appear asking you to confirm this space move. Read this popup carefully! It will explicitly warn you if you are about to overwrite an existing burial, marker, etc. Click "Continue" to confirm the space move.
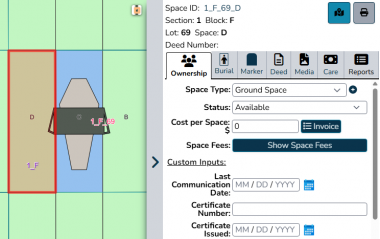
Platinum: Your map may take a few seconds to update. When it does, you will see that if you moved a burial or marker, it is now in the center of the new space.


Auto-tab date inputs

To turn on auto-tabbing:
- Click your name in the top navigation bar. From the dropdown, click on "User settings".
- Click the checkbox next to "Enable auto-tab date inputs" so that it is checked.
- You're ready to go right away, no need to refresh your page!
This field is license-specific; changing your date inputs to auto-tab will not affect your coworker's date inputs as long as they have their own license.