Advanced cemetery options

Advanced options for your cemetery are found in their own dedicated popup. Click on the name of your cemetery in the upper-left corner of CIMS, then click "Cemetery settings". This opens the edit cemetery settings popup.
Custom inputs (aka user-defined fields)
Automatic burial & deed numbering
Hide input fields & parts of the CIMS interface
Map shapes (CIMS Professional only)
Basic cemetery information
The "Basic" tab of the edit cemetery settings popup is where you can change your cemetery's name or address, choose the default date format, or add remarks. Some of these fields might be used in custom reports, if you have any.
Custom inputs (aka user-defined fields)

Use the "Advanced" tab to add, edit and delete custom inputs (also known as user-defined fields). User-defined fields can be added for spaces, burials, markers, deeds, care funds, customers or work orders.
What is a user-defined field?
Say you want to track something in CIMS but you don't see a field dedicated to it. You can add this field to the program. Any data you save in this custom input will be saved in CIMS and searchable. Common examples of custom inputs are "Book number" and "Page number", or "Lot card number" for cemeteries tracking where the original information about a space sale was stored. Some cemeteries choose to track a customer's birth place, or add a link to their online obituary.
Add a user-defined field
Scroll until you find the section you want to add a user-defined field to (space, burials, markers, etc.). Click the navy blue "New" button. Add a label, choose a type, then click "Add". It is not necessary to click "Update cemetery settings" at the bottom of the edit cemetery settings popup, but you will need to refresh your webpage to see the new fields you have added.
| Type | Description |
|---|---|
| Text input - single line of text | Most common type. Good for short text.
Example: Birth place: "Jackson Hole, WY" |
| Text input - multi- lines of text | Useful for longer blocks of text.
Example: Obituary: "Rev. Samuel Smith was born in 1954 on his family farm in ...... [text continues, this example does not]" |
| Dropdown select | Define a set of options for users inputting data to choose from. Excellent choice when you have a limited set of possibilities and want to make sure users don't spell things 5 different ways or get too creative. Use commas with no spaces to separate your options.
Example: Funeral service location: "Graveside,Whitehill Chapel,Louis Family Funeral Parlor,None" |
| Date input | Save a date in CIMS.
Example: Burial permit issued: "11/04/2009" |
| Numeric input | Good for numbers and costs.
Example: Down payment amount: "1500" |
| Last name lookup | Link a customer record to this custom input. Acts like other last-name lookups on the site, where you search by last name for a customer, then a list of results from your database will appear for you to choose from. Read about customer records here.
Example: Funeral director: "Francine Devine" |
| External link | Save a URL to your database. Useful for YouTube links to obituaries.
Example: Obituary video: "www.youtube.com/my-video-url" |

Edit a user-defined field
Click on the name of a user-defined field, type in your changes, then click "Update cemetery settings" at the bottom of the edit cemetery settings popup. Do the same to change dropdown options.
Delete a user-defined field
Click the red trash can icon to the right of a user-defined field to delete it. A popup will ask you confirm this action. Be careful, as you will delete any data associated with this field from CIMS!
Search a user-defined field
The best part about user-defined fields is you can search by them! Whatever section of your site you added a field for (space, burials, markers, etc.), just go to the search tab, choose that type, scroll down, and you will see your custom inputs listed at the bottom.
Rename cemetery levels

Does your cemetery use the term "Plot" instead of "Space"? or "Area" instead of "Section"? Do you have a columbarium using terms like "Wall", "Row" and "Niche"? You can personalize your cemetery section-by-section, as well as change the default terms.
In the edit cemetery settings popup, click the "Configuration" tab. The top section will allow you to specify what label each section of your cemetery uses. Change the "Universal levels" to change your default terms. Choose a section from that dropdown to change the labels for that section specifically.
To make a change, make your selection of section from the dropdown. Type in your changes in the appropriate fields. Click the green "Save levels term/label" button. When satisfied, click "Update cemetery settings" at the bottom-right of the edit cemetery settings popup, as your webpage needs to refresh to reflect these changes.
🎬Watch a video! Changing terms used for cemetery levels
Cost updating tool

Cemeteries often have to raise prices on a periodic basis. CIMS makes this easy with the cost updating tool.
In the edit cemetery settings popup, click the "Configuration" tab. Scroll down to the cost updating tool section. Choose to refine what area of your cemetery costs are updated for using the "Section" dropdown. By default, all sections of your cemetery will update. When you click a section, you may choose to further refine what areas of your cemetery update by block and lot. Once you have made your selection, enter a cost, then click the green "Update space costs" button. Your cemetery's button may have a slightly different name, such as "Update grave costs", depending on your settings.
The cost updating tool will only change the cost of available, reserved, and restricted spaces.
Automatic burial & deed numbering


CIMS has the option to automatically number deeds and burials for you. You can set what number CIMS starts these deeds or burials at.
For example, say your cemetery already has 450 burials and has been keeping track of them sequentially. You purchase CIMS and enter in all of your information and now want CIMS to continue this numbering of burials for you. Rather than inputting the next number in for each burial, CIMS will do it for you automatically! The same is true for deeds.
Automatic burial numbering
There are two parts to using automatic burial numbering:
- Add a number for automatic numbering
- In the "Configuration" tab of the edit cemetery settings popup, scroll down to the automatic numbering section. Click the navy "Edit" button next to the burial number field. Enter in the number of the last burial you recorded. Click "Update cemetery settings" in the lower-right corner of the popup.
- Add a custom input
- In the "Advanced" tab of the edit cemetery settings popup, scroll down to the burials section. Click the navy "New" button to add a new custom input. Label it "Burial Number" (capitalization is important) and choose the type text input - single line of text. Click the green "Add" button, then click "Update cemetery settings" in the lower-right corner of the popup. Learn more about custom inputs above.
If you entered in "450" as the burial number, the next time you create a burial, it will have the number "451".
Automatic deed numbering
In the "Configuration" tab of the edit cemetery settings popup, scroll down to the automatic numbering section. Click the navy "Edit" button next to the deed number field. Enter in the number of the last deed you issued. Click "Update cemetery settings" in the lower-right corner of the popup.
If you entered in "1300" as the deed number, the next time you create a deed, it will have the number "1301".
Notes
Automatic numbering is not smart enough to know when you've deleted a deed and are now re-issuing it; you will need to manually change that deed's number. Likewise, if you create deed numbers 402, 403 and 404, then delete 403, the system is not smart enough to know that 403 is missing, there will simply be a gap in your deed numbering. You can change the deed numbers by hand where necessary.
The same is true of burials; if you bury "Guy Jones" by accident and only find out much later after you've added other burials to your cemetery, when you delete the burial there will be a gap, a missing number, where "Guy" used to be. CIMS will not retroactively fix your automatic burial numbering.
Alphabetical or special characters for automatic burial or deed numbers are not allowed.
Calendar subscriptions
The CIMS documentation has a page dedicated to the calendar, read it to learn how you might show CIMS calendar events on your third-party calendar app, such as Google, Outlook or iCal.
Custom space statuses

CIMS has 5 built-in space statuses: "Available", "reserved", "restricted", "sold" and "sold with burial". You can add up to 3 custom space statuses whose usefulness will be limited, as you can only add cost, remarks and any custom inputs your cemetery may already have.
The most common space statuses we see cemeteries add are:
- Needs research - When a cemeterian is not sure if a space is sold, or if there are burials present, or some other reason where they will need to dig into their records or maybe physically go digging in the cemetery, they might change a space's status to "Needs research".
- Space does not exist - Somewhat redundant, as cemeteries could use the "Restricted" space status and specify a reason. Some cemeteries still choose to have a designated space status for spaces that don't exist.
Adding a custom space status
Click on the "Additional statuses" tab of the edit cemetery settings popup. Add up to 3 custom statuses, then click "Update cemetery settings" in the lower-right of the popup.
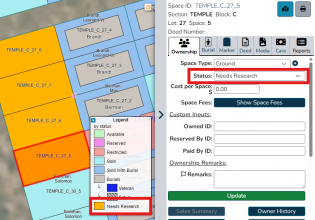
CIMS Professional: Custom space statuses will show as on the legend, as an option in the status dropdown in the Ownership tab, and visually on your map if a space is assigned that status.
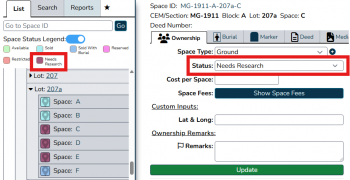
CIMS Core & Plus: Custom space statuses will show in the status legend in the List tab in the left-hand panel, as an option in the status dropdown in the Ownership tab, and visually in the List tab if a space is assigned that status.


Hide input fields & parts of the CIMS interface
Are there parts of the CIMS interface you're never going to use? Maybe your cemetery doesn't use care funds, or you never record the sales counselor of a space, or so on. You can choose to hide these fields!
Using the "Input fields" tab of the edit cemetery settings popup, find the input or entire section you wish to hide. Anything that is checked will show; to hide something, simply uncheck the checkbox next to it, then click "Update cemetery settings" in the lower-right corner of the popup. Your page will refresh; this is necessary to see the changes you made.
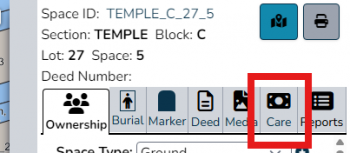
In this example, our cemetery wants to hide the Care tab, as we're never going to use care funds.
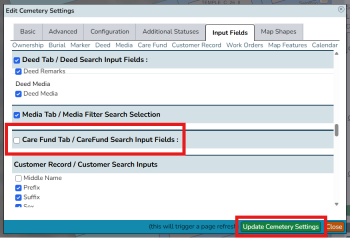
In the edit cemetery settings popup, click on the "Input fields" tab. Uncheck whatever you don't want to show in your interface; in this case, we unchecked the entire care fund tab. Click "Update cemetery settings".
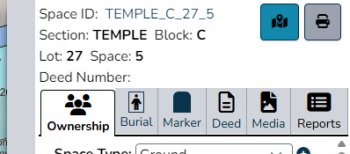
The Care tab is gone!


Map shapes (CIMS Professional only)

The "Map shapes" tab of the edit cemetery settings popup has 2 functions:
Set your default map shapes and sizes
These defaults are used when you add a marker, burial, vault or map feature to your map.
To set a default shape, click the circular button to the right of a shape, then click "Update cemetery settings". Likewise, use the slider to set a default size and click the same update button to save your changes.
Show or hide map shapes
This is useful if you don't want your employees using certain shapes, or if you're just never going to use a shape and want to simplify your interface.
A shape with a checked checkbox next to it will show as an option when adding a marker/burial/vault/map feature. To hide a shape, uncheck it, then click "Update cemetery settings".
If you hide a map shape from your options, it will not delete anything on your map that is already using this shape, don't worry!
