Burials (Core & Plus)
Add a burial
To add a burial to your cemetery:
- First, navigate to the space where the burial is/will be located. Click the Burial tab in the right-hand panel.
- This space needs to have a status of "Sold" or "Sold with burial". See the selling spaces page to learn how to sell a space.
- Click "New burial"
- A series of blank input fields will appear, asking for information about the burial. A burial type and interred name are required; all other fields are optional. Click "Save" when finished.
- Important! Remember to search for the interred by last name before adding them as a new customer in your cemetery. See avoiding duplicate customer records for more detailed information.
- That's it! If your space status was previously "Sold", CIMS has automatically changed it to "Sold with burial". This allows you to keep accurate counts of how many of your sold spaces are actually in use.
I have one burial located on two spaces, what do I do?
You need to pick one space to add the burial to. This is a current limitation of CIMS and cannot be changed.
Well now I have two burials on one space!
That's fine! You can have multiple burials on one space; we generally recommend adding no more than 50 burials on a single space, as too many burials on one space can slow CIMS down significantly. Simply repeat the above process of clicking the "New burial" button, filling information in and saving it, and you will see all burials listed appropriately.
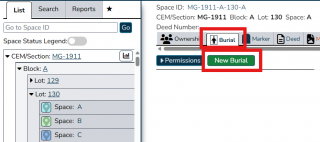
To add a burial, first click on a space's Burial tab, then "New burial".
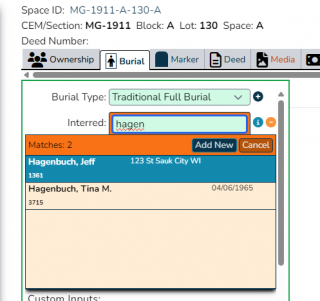
When adding an interred person's name, it is important to search for them by last name before adding them as a new customer to your database.
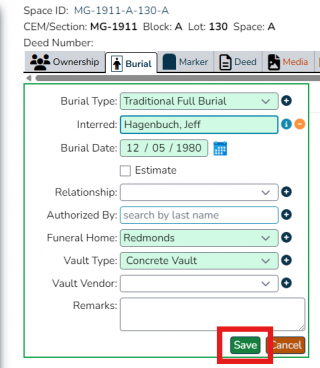
Fill out whatever other fields you would like to record in your database, then click "Save".
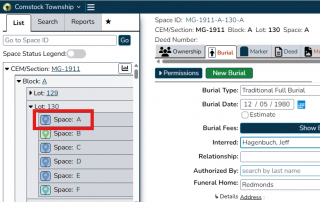
The burial has been added to your database! If this is the space's first burial and the status was previously sold, CIMS has automatically changed the status to "Sold with burial" and updated its block of color in the left-hand List tab.


Edit a burial
Open the space in the right-hand panel and click on the Burial tab. To edit or add burial information such as a burial date, funeral home, and so on, click on the field you want to edit, make your changes, then scroll down and click the "Update" button to save your changes.
Recording a date of death
To record a date of death, see the recording a date of death section of the customers page.
Disinter or remove a burial

Navigate to the burial you want to remove by opening its space in the right-hand panel, then clicking the Burial tab. Scroll down and click the red "Disinter/remove" button.
A popup will appear asking you to confirm this action. Click "Yes" to proceed.
The popup will then ask if you want to save the information to the disinterment list. Click "Yes" if you want to save a record that this person was interred in your cemetery at one point and no longer is. If this burial was a mistake, click "No".
Click "Continue" to finish disinterring/removing the burial.
Learn more about the disinterment list on our miscellaneous functions page.
Move a burial to a new space

Accidentally bury someone in the wrong space? No problem!
First, make sure the space you want to move the burial to has a status of "Sold" or "Sold with burial". See the selling spaces page to learn how to sell a space.
Navigate to the burial you want to move by opening its space in the right-hand panel, then clicking the Burial tab. Scroll down and click the orange "Move" button.
A popup will appear; use the section, block, lot and space dropdowns to choose the space where you want to move the burial to. A second popup will ask you to confirm the action, click "Yes". The burial has now been moved!
Burial permissions

Burial permissions are not required to bury someone in a cemetery. You may choose to use this feature if you want to very specifically designate certain spaces for individuals' future burial, or to grant burial permissions to a select handful of individuals. This feature might be useful for a family who is very particular about burial arrangements, or one with some family drama where certain members are not welcome in the family plot.
I don't see burial permissions?
They may be set to not show in your cemetery. Click your cemetery's name in the upper-left corner of CIMS. Choose "Advanced cemetery settings" from the dropdown. In the popup that appears, click on the "Input fields" tab. Scroll down to "Burial Tab" and make sure "Permissions" is checked. If it is not checked, click on the checkbox until a check appears, then click "Update cemetery settings" in the bottom-right corner of the popup.
Adding a burial permission
- Click the Burial tab on the space you want to add a permission to.
- Click the navy blue "Permissions" button, then search for the name of the person you wish to add permission for. Click "Add".
- Important! Remember to search for the person by last name before adding them as a new customer in your cemetery. See avoiding duplicate customer records for more detailed information.
- A popup will appear asking you to select the space or spaces this person has permission to be buried in. Select the relevant space(s) and click "Save".
Deleting a burial permission
Click on the red trash can icon next to the name of a burial permission's name. Click "Ok" in the confirmation popup.
The "Inter" button
When the time comes, easily inter someone with permission to be buried in a space using the navy blue "Inter" button.
Media
Just like with markers, deeds and more, you can add media to a permission. You may want to add a permission form or some other document pertaining to the granting of interment rights for a specific individual.
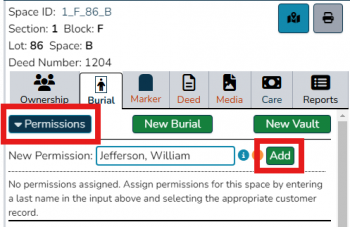
To add a burial permission, click "Permissions", input a name, then click "Add".
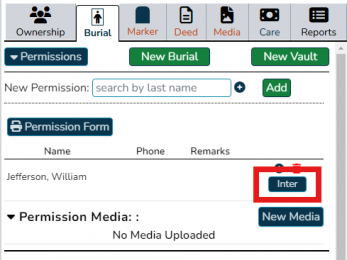
Now that a permission exists, they will appear in the Burial tab. Easily inter someone using the "Inter" button.

