Difference between revisions of "Map pins & more"
(Created page with "<span style="border:2px solid salmon;padding:10px;border-radius:5px;background-color:#fee7e5;margin:15px 0px;display:inline-block;">This page is under construction</span> Only CIMS Gold has a dedicated tab in the right-hand panel for its map. Pins on the map represent individual spaces. <br><br> Add pins to the map Move map pins Delete map pins Map pins &...") |
|||
| (18 intermediate revisions by the same user not shown) | |||
| Line 1: | Line 1: | ||
[[Map pins & more#Pins basics|Pins basics]] | |||
[[Map pins & more#Add pins to the map|Add pins to the map]] | [[Map pins & more#Add pins to the map|Add pins to the map]] | ||
| Line 11: | Line 8: | ||
[[Map pins & more#Change map pin colors|Change map pin colors]] | [[Map pins & more#Change map pin colors|Change map pin colors]] | ||
[[Map pins & more#Showing spaces with veterans|Showing spaces with veterans]] | |||
==Pins basics== | |||
[[File:Gold map pins.png|thumb|530x530px|The ideal CIMS Plus cemetery: Orderly pins representing cemetery spaces. Our default colors are green for available, light blue for sold and a darker blue for sold spaces with one or more burials present.]] | |||
Only CIMS Plus has a dedicated tab in the right-hand panel for its map. Pins on the map represent individual spaces; one pin represents one space. | |||
Map pins are NOT intended to represent burials. The correct way to handle a space with multiple burials in CIMS Plus is to create 1 space in your database, place 1 pin representing the space, and add multiple burials in the Burial tab of the right-hand panel. Read about [[Burials (Core & Plus)#Add a burial|adding burials here]]. | |||
<span style="border:2px solid #f2f2ce;padding:10px;border-radius:5px;background-color:#ffffeb;margin:15px 0px;display:inline-block;"><span style="display:flex;gap:10px;align-items: center"><span style="font-size: 24px">🎬</span><span>'''Watch a video!''' [https://youtu.be/1tYGPydii-A Mapping in CIMS Plus]</span></span></span> | |||
<br><br> | |||
==Add pins to the map== | ==Add pins to the map== | ||
<div style="clear:both;"></div> | Initially, your map in CIMS Plus will have no pins, you need to add them. The easiest way to do this to add all pins for a lot at once. You can also add pins individually. | ||
=== Method 1: Add pins by lot === | |||
#'''Add pins to map''' | |||
##In the right-hand panel, click the Map tab. Move the map to the area where you want the lot's pins to be placed. | |||
##In the left-hand panel, open the List tab. Open your sections and blocks until you find the lot whose pins you want to add to the map. | |||
##Hover over the name of the lot with your mouse. You will see a green location icon appear just to the right of the lot's name. Click it. | |||
## In the right-hand panel, you will see the map now has blue bars above and below that read "Map mode: Move pins". This indicates the map is ready for you to move its pins. | |||
#'''Move pins to their places''' | |||
## In the center of the map, circles have appeared with dotted outlines. These are your '''pins'''. The number of pins that appear correspond to the number of spaces in this lot that have not been added to the map yet. Each pin will have its space name in its center. | |||
##Click and drag on the pins to move them to their correct locations. The pins will initially be bunched up together, you will probably need to separate them out to read the numbers in the center first, then place them in their final positions. | |||
##When finished, click the green "Finish moving pins" button. | |||
##The pins are now locked in place. In the List tab of the left-hand panel, you can now see a faint location icon next to the space names, indicating these spaces have a pin on the map. | |||
If a lot has more than 25 unpinned spaces, only the first 25 pins will appear on the map. Move these pins to their correct locations, then click the green location icon to the right of the lot's name to get the next 25 pins. | |||
<span style="border:2px solid #f2f2ce;padding:10px;border-radius:5px;background-color:#ffffeb;margin:15px 0px;display:inline-block;"><span style="display:flex;gap:10px;align-items: center"><span style="font-size: 24px">🎬</span><span>'''Watch a video!''' [https://youtu.be/1tYGPydii-A?t=78 Adding pins by lot]</span></span></span> | |||
Optional: | |||
*You may want to use a grid while placing pins so that they are more regular. Click the navy "Show grid" button, then manipulate the height, width and angle inputs to change the grid to suit your cemetery. Click "Hide grid" to hide the grid. | |||
* You can directly input a pin's latitude and longitude if you have it for exact placement. | |||
<gallery widths="350" heights="250"> | |||
File:Add pin 1.png|Let's add a lot's pins to our map! Click on the "Map" tab and move it to the area you want to add the pins to go. Find the lot in the left-hand panel's List tab. Hover over the lot name and click the green location icon. | |||
File:Add pin 2.png|This lot has 6 spaces that haven't had their pins added to the map yet; 6 pins appear on my map, ready to be moved to their final positions. The dotted outlines indicate they have not been saved to the database yet. | |||
File:Add pin 3.png|Start moving the pins by clicking and dragging them. Separate them out so you can read their labels. | |||
File:Add pin 4.png|Optionally, you can input exact latitude and longitude or use a grid to help you place pins. | |||
File:Add pin 5.png|When satisfied, click "Finish moving pins". | |||
File:Add pin 6.png|That's it! Our pins have been saved to the database. Note that in the List tab, there is a faint location icon next to space names indicating they have pins on the map. | |||
</gallery> | |||
===Method 2: Add a single pin=== | |||
#'''Navigate to the space in CIMS''' | |||
##Using the List tab, open sections, blocks and lots until you find the space whose pin you want to add on the map. Click it so its information loads in the right-hand panel. | |||
##Click the map tab and move the map to the area where you want the pin to be placed. | |||
## Click the green pin icon located to the left of the map, above the "Move pins" button. | |||
# '''Move pin to its place''' | |||
## In the center of the map, a circle has appeared with a dotted outline. This is your '''pin'''. The name in its center should correspond to the name of the space you clicked on in step 1 (above). | |||
##Click and drag on the pin to move it to its correct location. | |||
##When finished, click the green "Finish moving pins" button. | |||
##The pin is now locked in place. In the List tab of the left-hand panel, you can now see a faint location icon next to the space's name, indicating this space has a pin on the map. | |||
<span style="border:2px solid #f2f2ce;padding:10px;border-radius:5px;background-color:#ffffeb;margin:15px 0px;display:inline-block;"><span style="display:flex;gap:10px;align-items: center"><span style="font-size: 24px">🎬</span><span>'''Watch a video!''' [https://youtu.be/1tYGPydii-A?t=278 Adding single pins]</span></span></span> | |||
Optional: | |||
*You may want to use a grid while placing pins so that they are more regular. Click the navy "Show grid" button, then manipulate the height, width and angle inputs to change the grid to suit your cemetery. Click "Hide grid" to hide the grid. | |||
*You can directly input a pin's latitude and longitude if you have it for exact placement. | |||
<gallery widths="350" heights="250"> | |||
File:Add singular pin 1.png|Start by opening the space whose pin you want to add to the map in the right-hand panel. The easiest way to do this is by clicking on it from the List tab. | |||
File:Add singular pin 2.png|Click the Map tab and move the map to the area where you want to add the pin. Click the green location icon (outlined in red above). | |||
File:Add singular pin 3.png|The pin appears on the map; it has a dotted outline to indicate it hasn't been saved to the database yet. | |||
File:Add singular pin 4.png|Click and drag the pin to move it. When satisfied, click the green "Finish moving pins" button. | |||
File:Add singular pin 5.png|That's it! The pin is saved in the database. You can see a faint location icon next to the space's name, indicating it has a pin on the map. | |||
</gallery><div style="clear:both;"></div> | |||
== Move map pins== | |||
[[File:Move pins button.png|thumb|470x470px|Use the "Move pins" button to move one or more pins around your map. In the above example, somehow one of our pins got slightly out of place!]] | |||
*To move a map pin, click on the Map tab in the right-hand panel and move the map to the area where you want to move one or more pins. | |||
**Trying to move a specific space's pin? It's easiest to use the List tab to find the space and click on it. The map will then be centered on that pin; if it is not, this space may not have a pin yet. Alternately, you may have clicked on the wrong space from the List tab. | |||
*Click the green "Move pins" button to the left of the map. You will see the map now has blue bars above and below that read "Map mode: Move pins". This indicates the map is ready for you to move its pins. | |||
* Click and drag on any pins you want to move. | |||
*When done, click "Finish moving pins" and the pins will be locked in place. | |||
<span style="border:2px solid #f2f2ce;padding:10px;border-radius:5px;background-color:#ffffeb;margin:15px 0px;display:inline-block;"><span style="display:flex;gap:10px;align-items: center"><span style="font-size: 24px">🎬</span><span>'''Watch a video!''' [https://youtu.be/1tYGPydii-A?t=369 Moving pins]</span></span></span> | |||
<div style="clear:both;"></div> | <div style="clear:both;"></div> | ||
==Delete map pins== | ==Delete map pins== | ||
[[File:Delete a pin.png|thumb|520x520px|Click on a pin, then the red trash can icon to delete it.]] | |||
Deleting a pin does not delete the space or the space's information from your database. | |||
To delete a pin, simply click on it on the map, then click the red trash can icon that appears with its information. A popup will ask you to confirm the action; click "Ok". | |||
<br> | |||
<span style="border:2px solid #f2f2ce;padding:10px;border-radius:5px;background-color:#ffffeb;margin:15px 0px;display:inline-block;"><span style="display:flex;gap:10px;align-items: center"><span style="font-size: 24px">🎬</span><span>'''Watch a video!''' [https://youtu.be/1tYGPydii-A?t=369 Deleting pins]</span></span></span> | |||
<div style="clear:both;"></div> | <div style="clear:both;"></div> | ||
==Change map pin colors== | ==Change map pin colors== | ||
We have a section elsewhere in the wiki dedicated to changing map colors for CIMS | We have a section elsewhere in the wiki dedicated to changing map colors for CIMS Plus. Find it on [[Spaces list (Core & Plus)#Space status legend|the spaces list page]]. | ||
<br><br> | |||
==Showing spaces with veterans== | |||
CIMS Plus users are able to see spaces where veteran burials are located, assuming those spaces have a pin on the map. | |||
In the Map tab of the right-hand panel, click the "Show veterans" checkbox. Any space that has a map pin and has one or more veteran burials on it will display on the map. <gallery widths="500" heights="320"> | |||
File:Normal CIMS Plus map.png|In the normal view of a CIMS Plus map, all map pins show. | |||
File:Show veterans checkbox.png|With the "Show veterans" checkbox enabled, only those spaces where one or more veterans are buried are shown. | |||
</gallery> | |||
Latest revision as of 15:20, 29 August 2026
Pins basics

Only CIMS Plus has a dedicated tab in the right-hand panel for its map. Pins on the map represent individual spaces; one pin represents one space.
Map pins are NOT intended to represent burials. The correct way to handle a space with multiple burials in CIMS Plus is to create 1 space in your database, place 1 pin representing the space, and add multiple burials in the Burial tab of the right-hand panel. Read about adding burials here.
🎬Watch a video! Mapping in CIMS Plus
Add pins to the map
Initially, your map in CIMS Plus will have no pins, you need to add them. The easiest way to do this to add all pins for a lot at once. You can also add pins individually.
Method 1: Add pins by lot
- Add pins to map
- In the right-hand panel, click the Map tab. Move the map to the area where you want the lot's pins to be placed.
- In the left-hand panel, open the List tab. Open your sections and blocks until you find the lot whose pins you want to add to the map.
- Hover over the name of the lot with your mouse. You will see a green location icon appear just to the right of the lot's name. Click it.
- In the right-hand panel, you will see the map now has blue bars above and below that read "Map mode: Move pins". This indicates the map is ready for you to move its pins.
- Move pins to their places
- In the center of the map, circles have appeared with dotted outlines. These are your pins. The number of pins that appear correspond to the number of spaces in this lot that have not been added to the map yet. Each pin will have its space name in its center.
- Click and drag on the pins to move them to their correct locations. The pins will initially be bunched up together, you will probably need to separate them out to read the numbers in the center first, then place them in their final positions.
- When finished, click the green "Finish moving pins" button.
- The pins are now locked in place. In the List tab of the left-hand panel, you can now see a faint location icon next to the space names, indicating these spaces have a pin on the map.
If a lot has more than 25 unpinned spaces, only the first 25 pins will appear on the map. Move these pins to their correct locations, then click the green location icon to the right of the lot's name to get the next 25 pins.
🎬Watch a video! Adding pins by lot
Optional:
- You may want to use a grid while placing pins so that they are more regular. Click the navy "Show grid" button, then manipulate the height, width and angle inputs to change the grid to suit your cemetery. Click "Hide grid" to hide the grid.
- You can directly input a pin's latitude and longitude if you have it for exact placement.
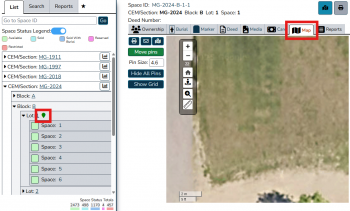
Let's add a lot's pins to our map! Click on the "Map" tab and move it to the area you want to add the pins to go. Find the lot in the left-hand panel's List tab. Hover over the lot name and click the green location icon.
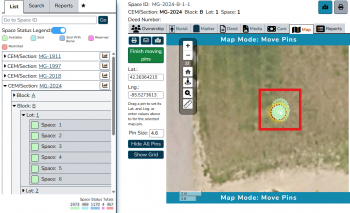
This lot has 6 spaces that haven't had their pins added to the map yet; 6 pins appear on my map, ready to be moved to their final positions. The dotted outlines indicate they have not been saved to the database yet.
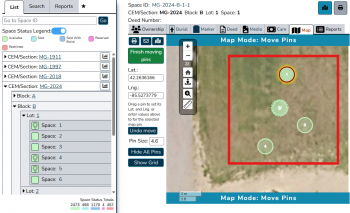
Start moving the pins by clicking and dragging them. Separate them out so you can read their labels.
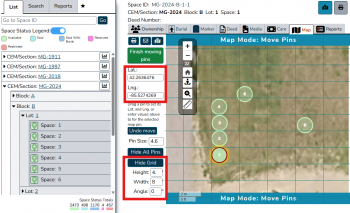
Optionally, you can input exact latitude and longitude or use a grid to help you place pins.
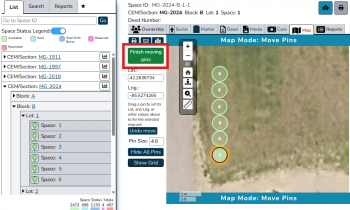
When satisfied, click "Finish moving pins".
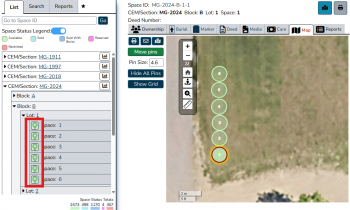
That's it! Our pins have been saved to the database. Note that in the List tab, there is a faint location icon next to space names indicating they have pins on the map.


Method 2: Add a single pin
- Navigate to the space in CIMS
- Using the List tab, open sections, blocks and lots until you find the space whose pin you want to add on the map. Click it so its information loads in the right-hand panel.
- Click the map tab and move the map to the area where you want the pin to be placed.
- Click the green pin icon located to the left of the map, above the "Move pins" button.
- Move pin to its place
- In the center of the map, a circle has appeared with a dotted outline. This is your pin. The name in its center should correspond to the name of the space you clicked on in step 1 (above).
- Click and drag on the pin to move it to its correct location.
- When finished, click the green "Finish moving pins" button.
- The pin is now locked in place. In the List tab of the left-hand panel, you can now see a faint location icon next to the space's name, indicating this space has a pin on the map.
🎬Watch a video! Adding single pins
Optional:
- You may want to use a grid while placing pins so that they are more regular. Click the navy "Show grid" button, then manipulate the height, width and angle inputs to change the grid to suit your cemetery. Click "Hide grid" to hide the grid.
- You can directly input a pin's latitude and longitude if you have it for exact placement.
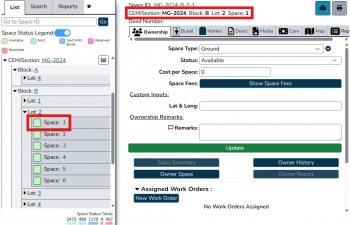
Start by opening the space whose pin you want to add to the map in the right-hand panel. The easiest way to do this is by clicking on it from the List tab.
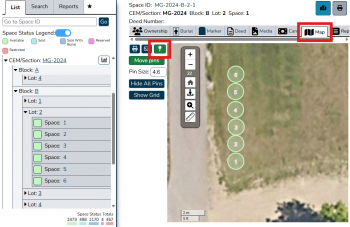
Click the Map tab and move the map to the area where you want to add the pin. Click the green location icon (outlined in red above).
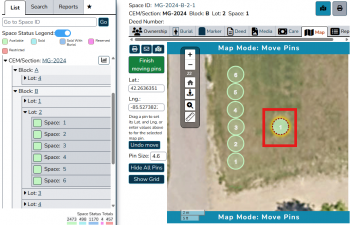
The pin appears on the map; it has a dotted outline to indicate it hasn't been saved to the database yet.
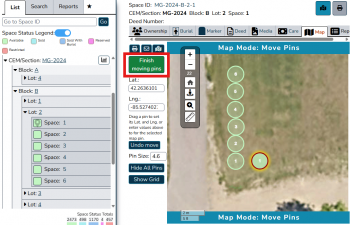
Click and drag the pin to move it. When satisfied, click the green "Finish moving pins" button.
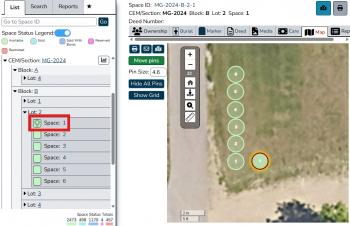
That's it! The pin is saved in the database. You can see a faint location icon next to the space's name, indicating it has a pin on the map.


Move map pins

- To move a map pin, click on the Map tab in the right-hand panel and move the map to the area where you want to move one or more pins.
- Trying to move a specific space's pin? It's easiest to use the List tab to find the space and click on it. The map will then be centered on that pin; if it is not, this space may not have a pin yet. Alternately, you may have clicked on the wrong space from the List tab.
- Click the green "Move pins" button to the left of the map. You will see the map now has blue bars above and below that read "Map mode: Move pins". This indicates the map is ready for you to move its pins.
- Click and drag on any pins you want to move.
- When done, click "Finish moving pins" and the pins will be locked in place.
🎬Watch a video! Moving pins
Delete map pins

Deleting a pin does not delete the space or the space's information from your database.
To delete a pin, simply click on it on the map, then click the red trash can icon that appears with its information. A popup will ask you to confirm the action; click "Ok".
🎬Watch a video! Deleting pins
Change map pin colors
We have a section elsewhere in the wiki dedicated to changing map colors for CIMS Plus. Find it on the spaces list page.
Showing spaces with veterans
CIMS Plus users are able to see spaces where veteran burials are located, assuming those spaces have a pin on the map.
In the Map tab of the right-hand panel, click the "Show veterans" checkbox. Any space that has a map pin and has one or more veteran burials on it will display on the map.
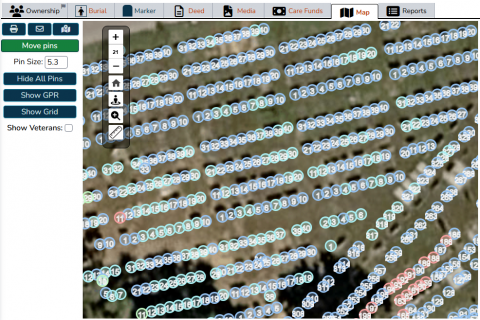
In the normal view of a CIMS Plus map, all map pins show.
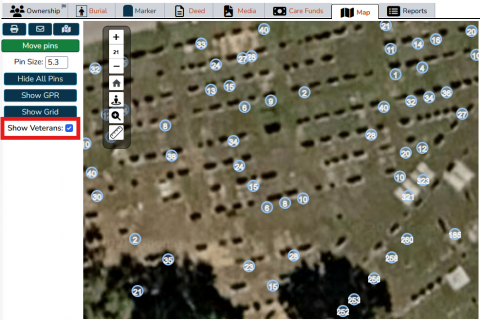
With the "Show veterans" checkbox enabled, only those spaces where one or more veterans are buried are shown.

