Difference between revisions of "Deeds (Core & Plus)"
(Created page with "<span style="border:2px solid #ffc321;padding:10px;border-radius:5px;background-color:#ffe59f;margin:15px 0px;display:inline-block;">This page is under construction</span>") |
|||
| (7 intermediate revisions by the same user not shown) | |||
| Line 1: | Line 1: | ||
< | [[Deeds (Core & Plus)#What is a deed|What is a deed]] | ||
[[Deeds (Core & Plus)#Create a deed|Create a deed]] | |||
[[Deeds (Core & Plus)#Edit a deed|Edit a deed]] | |||
[[Deeds (Core & Plus)#Delete a deed|Delete a deed]] | |||
[[Deeds (Core & Plus)#Selling a space back to the cemetery|Selling a space back to the cemetery]] | |||
[[Deeds (Core & Plus)#Add media to a deed|Add media to a deed]] | |||
[[Deeds (Core & Plus)#Generate a deed document in CIMS|Generate a deed document in CIMS]] | |||
[[Deeds (Core & Plus)#Custom deeds|Custom deeds]] | |||
[[Deeds (Core & Plus)#Automatic deed numbering|Automatic deed numbering]] | |||
<br><br> | |||
== What is a deed== | |||
We understand most cemeteries don't issue deeds, they issue rights of burial. For the purposes of brevity, CIMS documentation will use the term "deed". | |||
Create a deed when one or multiple spaces has been purchased as recognition of the sale; once created, you can generate a deed document directly from CIMS or upload media, such as an image of a deed originally recorded on paper or in a log book, to the deed. | |||
<br><br> | |||
<div style="clear:both;"></div> | |||
==Create a deed== | |||
To create a deed for one or more spaces, the spaces will first need to be sold. See the page [[Selling spaces & more (Core & Plus)|Selling spaces & more.]] | |||
*Open the space where the you want to create the deed for in the right-hand panel. Click the Deed tab. | |||
* Start entering information in the fields. The need type is a required field; all other fields are optional, though we recommend adding the deed date and purchase cost if you have that information. Click "Save". | |||
*A popup will appear asking which spaces this deed applies to. You can pick one or multiple spaces simultaneously. Click "Save". | |||
*Your deed has been created! If it is attached to multiple spaces, you will see those spaces listed. | |||
<gallery widths="350" heights="280"> | |||
File:Deed creation 1.png|Select one of the spaces you want to add a deed to and click the Deed tab. Fill in the information for the deed and click "Save". | |||
File:Deed creation 2.png|Choose which space or spaces to attach the deed to. In this case, we are attaching the deed to all spaces owned by the space's owner. Click "Save". | |||
File:Deed creation 3.png|The saved deed will clearly display which spaces are attached to it. | |||
</gallery><br><br> | |||
<div style="clear:both;"></div> | |||
==Edit a deed== | |||
[[File:Removing a deed.png|thumb|369x369px|When removing a deed from multiple spaces, you will have the option to remove it from one or all spaces.]] | |||
====Changing deed information==== | |||
Open the space whose deed you want to edit in the right-hand panel. Click on the Deed tab. Edit the fields you want to change by clicking on them and typing in them. When ready, click "Update". | |||
====Adding an existing deed to a space==== | |||
To add a deed to a space, you will need to delete the deed, then re-create and attach it to the appropriate spaces. | |||
==== Remove a space from an existing deed==== | |||
Click the red "Remove deed" button. If this deed is attached to multiple spaces, you will see options to remove the deed from one or all spaces. Click "Cancel remove deed" if you change your mind and don't want to make changes to what spaces this deed is attached to. | |||
<br><br> | |||
<div style="clear:both;"></div> | |||
==Delete a deed== | |||
To delete a deed, open its information in the right-hand panel then click the red "Remove deed" button. | |||
==== Deeds with one space assigned==== | |||
If the deed is only assigned to one space, a popup will appear asking you to confirm. Click "Ok". The deed, including any media attached to it, has now been deleted. | |||
====Deeds with multiple spaces assigned==== | |||
If the deed is assigned to multiple spaces, you have two options: You can remove the deed from just one space, or from all its assigned spaces. Click the red "Remove" button next to the option you want. Click "Ok" in the confirmation popup. If you chose to remove the deed from just one space, it has only been removed from that space and still exists as the deed for the other spaces assigned to it. If you chose to remove the deed from all its assigned spaces, the deed, including any media attached to it, has now been deleted.<gallery widths="380" heights="280"> | |||
File:Removing a deed 2.png|To remove a deed, click the red "Remove deed" button in the Deed tab. | |||
File:Removing a deed.png|When removing a deed that has multiple spaces assigned to it, you can choose to remove the deed from just one space or all spaces (which deletes it entirely). | |||
File:Remove deed confirmation.png|A popup will ask you to confirm that you want to remove a deed. Click "Ok". | |||
</gallery><br><br> | |||
<div style="clear:both;"></div> | |||
==Selling a space back to the cemetery== | |||
If an owner forfeits a space, or sells it back to the cemetery, refer to [[Selling spaces & more (Core & Plus)#Selling a space back to the cemetery|our documentation on selling a space back to the cemetery]]. | |||
<br><br> | |||
<div style="clear:both;"></div> | |||
==Add media to a deed== | |||
[[File:Deed media in CIMS.png|thumb|340x340px|Here is a deed with one piece of media attached to it, a PDF. Clicking on a PDF opens it in a new tab, where you can print or download the document.]] | |||
Your cemetery may want to upload a copy of a deed to CIMS. This deed might be originally on paper, or a digital document, it doesn't matter. From the Deed tab, scroll down to the deed media section and click the navy "New media" button. A popup will appear with 3 tabs: | |||
*Tab 1 allows you to upload an image from your device. You can choose to resize the image or keep its original size. | |||
*Tab 2 allows you to use your device's camera to take a photo and directly upload it into CIMS. This is an especially useful option if you have a lot of paper records you want to take photos of! Just use a tablet's built-in camera or use a document camera attached to your computer. | |||
*Tab 3 allows you to save a YouTube link as media. | |||
Use the relevant tab to add your media, then click "Save". Your media has now been saved to the deed! | |||
<br><br> | |||
<div style="clear:both;"></div> | |||
==Generate a deed document in CIMS== | |||
You can generate deed documents directly in CIMS using either our default deed or a custom-built one. See below for more information about custom deeds. | |||
Click on one of the spaces the deed is attached to, or otherwise load its information in the right-hand panel. Click on the Deed tab. Scroll down to the "Template" dropdown and choose an option, usually "Default deed". Click the navy blue "Generate" button. | |||
A preview of the deed will appear in a popup. Please note, this preview is not 100% accurate and may appear different when printed, as web and print technologies do not always play nicely together. The deed will have certain information auto-filled as long as you have it saved in CIMS; the default deed will show the space or spaces attached to the deed, deed date, owner and co-owner names, and more. Save or print the deed using the buttons in the bottom-right to see what the final printable or save-able document looks like. | |||
The "Save" button in the bottom-right will save the deed directly into CIMS as a PDF. The "Print" button can be used to print the deed or to save it as a PDF on your device.<gallery widths="375" heights="250"> | |||
File:Deed creation 4.png|To generate a deed document, choose a template from the dropdown and click "Generate". | |||
File:Deed creation 5.png|A preview of the document will appear. As you can see, CIMS has auto-filled in certain information, such as the names of the owner and co-owner, the spaces the deed is attached to, the cost, and more. The deed can be printed, saved to your device or saved directly into CIMS from this popup. | |||
</gallery><br><br> | |||
<div style="clear:both;"></div> | |||
==Custom deeds== | |||
CIMS can create a custom deed for you! This deed will auto-fill information such as deed date, owner and co-owner names, cost, and much more; all you need to do is first save the information in CIMS, then generate the deed. We can add your cemetery's logo, custom legalese your team provides us, specific fonts and formatting, and more. [https://www.cimscemeterysoftware.com/technical-support/ Contact our team] to learn more about the process of creating a custom deed. | |||
<br><br> | |||
<div style="clear:both;"></div> | |||
==Automatic deed numbering== | |||
CIMS has the option to automatically number deeds for you. You can set what number CIMS starts these deeds at, but it will need to be an integer, special characters are not allowed. | |||
To learn more, see the page on [[Advanced cemetery options#Automatic burial & deed numbering|Advanced cemetery options]]. | |||
<br><br> | |||
<div style="clear:both;"></div> | |||
Latest revision as of 16:14, 15 May 2026
Selling a space back to the cemetery
Generate a deed document in CIMS
What is a deed
We understand most cemeteries don't issue deeds, they issue rights of burial. For the purposes of brevity, CIMS documentation will use the term "deed".
Create a deed when one or multiple spaces has been purchased as recognition of the sale; once created, you can generate a deed document directly from CIMS or upload media, such as an image of a deed originally recorded on paper or in a log book, to the deed.
Create a deed
To create a deed for one or more spaces, the spaces will first need to be sold. See the page Selling spaces & more.
- Open the space where the you want to create the deed for in the right-hand panel. Click the Deed tab.
- Start entering information in the fields. The need type is a required field; all other fields are optional, though we recommend adding the deed date and purchase cost if you have that information. Click "Save".
- A popup will appear asking which spaces this deed applies to. You can pick one or multiple spaces simultaneously. Click "Save".
- Your deed has been created! If it is attached to multiple spaces, you will see those spaces listed.
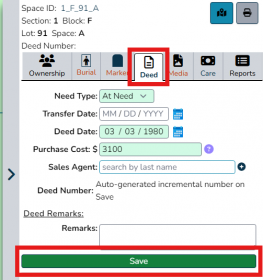
Select one of the spaces you want to add a deed to and click the Deed tab. Fill in the information for the deed and click "Save".
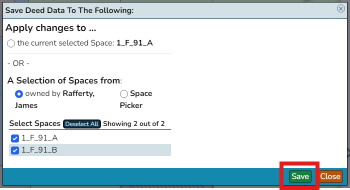
Choose which space or spaces to attach the deed to. In this case, we are attaching the deed to all spaces owned by the space's owner. Click "Save".
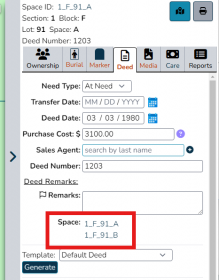
The saved deed will clearly display which spaces are attached to it.


Edit a deed

Changing deed information
Open the space whose deed you want to edit in the right-hand panel. Click on the Deed tab. Edit the fields you want to change by clicking on them and typing in them. When ready, click "Update".
Adding an existing deed to a space
To add a deed to a space, you will need to delete the deed, then re-create and attach it to the appropriate spaces.
Remove a space from an existing deed
Click the red "Remove deed" button. If this deed is attached to multiple spaces, you will see options to remove the deed from one or all spaces. Click "Cancel remove deed" if you change your mind and don't want to make changes to what spaces this deed is attached to.
Delete a deed
To delete a deed, open its information in the right-hand panel then click the red "Remove deed" button.
Deeds with one space assigned
If the deed is only assigned to one space, a popup will appear asking you to confirm. Click "Ok". The deed, including any media attached to it, has now been deleted.
Deeds with multiple spaces assigned
If the deed is assigned to multiple spaces, you have two options: You can remove the deed from just one space, or from all its assigned spaces. Click the red "Remove" button next to the option you want. Click "Ok" in the confirmation popup. If you chose to remove the deed from just one space, it has only been removed from that space and still exists as the deed for the other spaces assigned to it. If you chose to remove the deed from all its assigned spaces, the deed, including any media attached to it, has now been deleted.
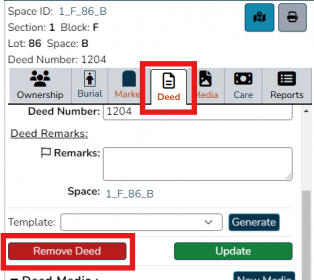
To remove a deed, click the red "Remove deed" button in the Deed tab.
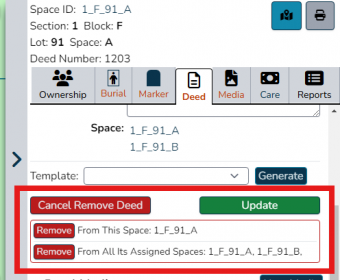
When removing a deed that has multiple spaces assigned to it, you can choose to remove the deed from just one space or all spaces (which deletes it entirely).
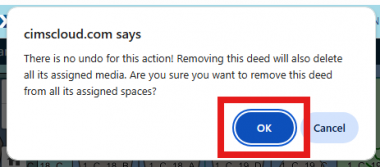
A popup will ask you to confirm that you want to remove a deed. Click "Ok".


Selling a space back to the cemetery
If an owner forfeits a space, or sells it back to the cemetery, refer to our documentation on selling a space back to the cemetery.
Add media to a deed

Your cemetery may want to upload a copy of a deed to CIMS. This deed might be originally on paper, or a digital document, it doesn't matter. From the Deed tab, scroll down to the deed media section and click the navy "New media" button. A popup will appear with 3 tabs:
- Tab 1 allows you to upload an image from your device. You can choose to resize the image or keep its original size.
- Tab 2 allows you to use your device's camera to take a photo and directly upload it into CIMS. This is an especially useful option if you have a lot of paper records you want to take photos of! Just use a tablet's built-in camera or use a document camera attached to your computer.
- Tab 3 allows you to save a YouTube link as media.
Use the relevant tab to add your media, then click "Save". Your media has now been saved to the deed!
Generate a deed document in CIMS
You can generate deed documents directly in CIMS using either our default deed or a custom-built one. See below for more information about custom deeds.
Click on one of the spaces the deed is attached to, or otherwise load its information in the right-hand panel. Click on the Deed tab. Scroll down to the "Template" dropdown and choose an option, usually "Default deed". Click the navy blue "Generate" button.
A preview of the deed will appear in a popup. Please note, this preview is not 100% accurate and may appear different when printed, as web and print technologies do not always play nicely together. The deed will have certain information auto-filled as long as you have it saved in CIMS; the default deed will show the space or spaces attached to the deed, deed date, owner and co-owner names, and more. Save or print the deed using the buttons in the bottom-right to see what the final printable or save-able document looks like.
The "Save" button in the bottom-right will save the deed directly into CIMS as a PDF. The "Print" button can be used to print the deed or to save it as a PDF on your device.
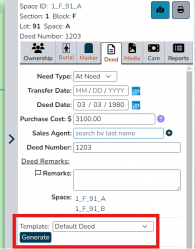
To generate a deed document, choose a template from the dropdown and click "Generate".
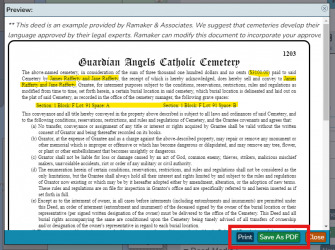
A preview of the document will appear. As you can see, CIMS has auto-filled in certain information, such as the names of the owner and co-owner, the spaces the deed is attached to, the cost, and more. The deed can be printed, saved to your device or saved directly into CIMS from this popup.


Custom deeds
CIMS can create a custom deed for you! This deed will auto-fill information such as deed date, owner and co-owner names, cost, and much more; all you need to do is first save the information in CIMS, then generate the deed. We can add your cemetery's logo, custom legalese your team provides us, specific fonts and formatting, and more. Contact our team to learn more about the process of creating a custom deed.
Automatic deed numbering
CIMS has the option to automatically number deeds for you. You can set what number CIMS starts these deeds at, but it will need to be an integer, special characters are not allowed.
To learn more, see the page on Advanced cemetery options.