Difference between revisions of "Burials"
Jump to navigation
Jump to search
| Line 19: | Line 19: | ||
==== I have one burial located on two spaces, what do I do? ==== | ==== I have one burial located on two spaces, what do I do? ==== | ||
You need to pick one space to add the burial to. You can always visually represent the burial crossing over multiple spaces. This is a current limitation of CIMS and cannot be changed. | You need to pick one space to add the burial to. You can always visually represent the burial crossing over multiple spaces. This is a current limitation of CIMS and cannot be changed.<gallery widths="350" heights="300"> | ||
File:Adding burial 1.png|To add a burial, first click on a space's Burial tab, then "New burial". | |||
File:Adding burial 2.png|Next, place the burial shape on your map. Change the shape, size and orientation, then click "Next". | |||
File:Adding burial 3.png|On the next screen, it is important to search for the interred person by last name before adding them as a new customer to your database. | |||
File:Adding burial 4.png|Fill out whatever other fields you would like to record in your database, then click "Save". | |||
File:Adding burial 5.png|The burial has been added to your database and appears on your map! | |||
</gallery><br><br> | |||
== Edit a burial == | ==Edit a burial== | ||
== Disinter or remove a burial == | ==Disinter or remove a burial == | ||
Coming soon! | Coming soon! | ||
Revision as of 15:39, 3 March 2025
Add a burial
To add a burial to your cemetery:
- First, navigate to the space where the burial is/will be located. Click the Burial tab.
- This space needs to have a status of "Sold" or "Sold with burial". See the selling spaces page to learn how to sell a space.
- Click "New burial"
- A default burial shape will appear on the map. Change the shape of the burial using the thumbnail images; some cemeteries like to use the coffin shape to show the orientation of the burial, and many use the circle shape to indicate a cremation. Click on the map to move the shape or use the controls in the right-hand flyout. Similarly, you can change the rotation of the shape using controls in the right-hand flyout. When satisfied, click "Next".
- A burial type and interred name are required; all other fields are optional. Click "Save" when finished.
- Important! Remember to search for the interred by last name before adding them as a new customer in your cemetery. See avoiding duplicate customer records for more detailed information.
- That's it! Give the map a few seconds to refresh, and you should see the burial appear.
- If your space status was previously "Sold", CIMS has automatically changed it to "Sold with burial". This allows you to keep accurate counts of how many of your sold spaces are actually in use.
I have one burial located on two spaces, what do I do?
You need to pick one space to add the burial to. You can always visually represent the burial crossing over multiple spaces. This is a current limitation of CIMS and cannot be changed.
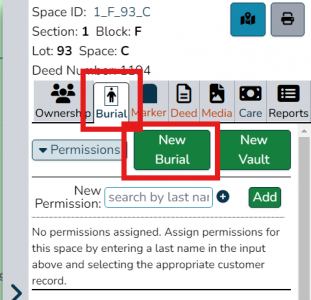
To add a burial, first click on a space's Burial tab, then "New burial".
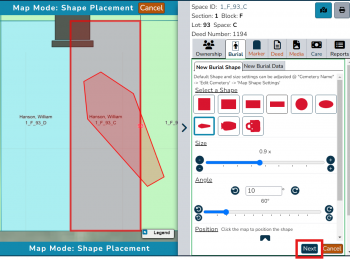
Next, place the burial shape on your map. Change the shape, size and orientation, then click "Next".
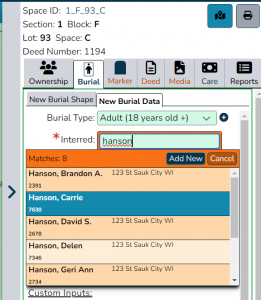
On the next screen, it is important to search for the interred person by last name before adding them as a new customer to your database.
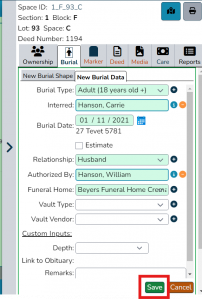
Fill out whatever other fields you would like to record in your database, then click "Save".
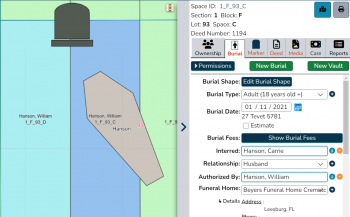
The burial has been added to your database and appears on your map!


Edit a burial
Disinter or remove a burial
Coming soon!