Map appearance

CIMS allows for extensive customization of your map's appearance. Change space colors, text sizes and colors, fonts, marker and burial colors, and much more.
Map appearance basics
The map appearance is controlled by the "Layers" popup. Click on your username in the top-right corner of your screen, then click "Layers". This will open a popup with several tabs along the left side.
Common things our users like to change include:
Examples of different map appearances
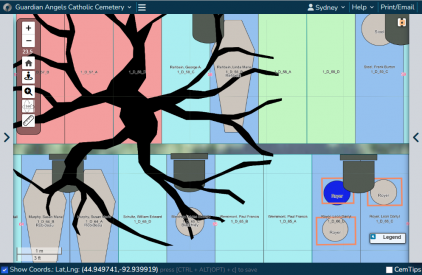
The default layers settings will show veteran burials in blue and non-veteran burials in grey. Seen in the above cemetery is a tree to the left (in black), several headstones (in dark grey), and a few vaults (salmon rectangles in the bottom-right).
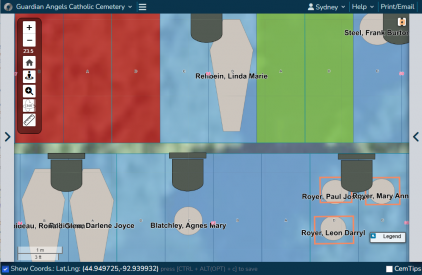
This is the same exact section of cemetery, only this user has chosen to hide map features (such as the tree). The space colors have been changed and the names of burials are larger and bold.
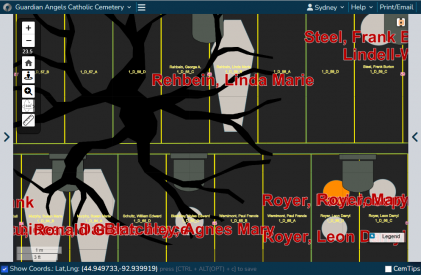
An extreme example of how dramatically we can change the appearance of the map. While we might not advise using this color scheme, you are absolutely free to do so!


Changing the color of spaces
- Click on the "Space" tab on the left side of the Layers popup, just above the "Burials" tab.
- Your tab may actually be called "Plot", "Grave", "Plat", or another term, depending on how your cemetery is set up.
- Choose to color spaces by status or by type. The recommended setting is status.
- Click on the square of color next to each of your statuses. This will open a color picker, allowing you to change the color of the status.
- Remember to click "Save" when you are happy with your changes!

Veteran burials
You can choose to make veteran burials a different color from non-veteran burials. In the Layers popup, click on the "Burials" tab on the left side. Click the checkbox next to "Highlight veterans" so that it is checked. Next, choose the color you would like veteran burials to show as by clicking on the square next to "Veteran color". Remember to click save!

Making text larger
To make text larger, there are 2 places we need to change the text settings:
- Space tab
- Click on the "Space" tab. Scroll down and you will see options to control how spaces are labelled (common choices are "Owner last name" and "Space ID").
- Your tab may actually be called "Plot", "Grave", "Plat", or another term, depending on how your cemetery is set up.
- To make the text larger, find the "Size" dropdown and choose a larger size, such as 20px. You may also want to make the text bold by clicking the "B" next to the "Bold" label.
- Other options you can change include the text font and color.
- Click on the "Space" tab. Scroll down and you will see options to control how spaces are labelled (common choices are "Owner last name" and "Space ID").
- Burials tab
- Click on the "Burials" tab. Scroll down and you will see options to control how burials are labelled (clients often choose "Full name").
- Beneath the burial label are options to control the text appearance. To make the text larger, find the "Size" dropdown and choose a larger size.
- You can also change to the color, font, and text bolding, just like with spaces.
Click "Save", then close the Layers popup to see your map appearance changes.
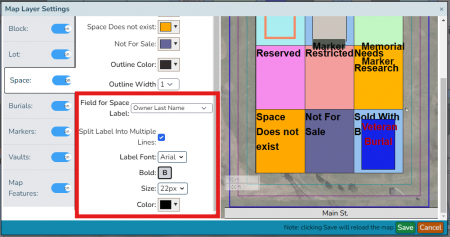
Click on the "Space" tab and change the "Size" to make space labels larger
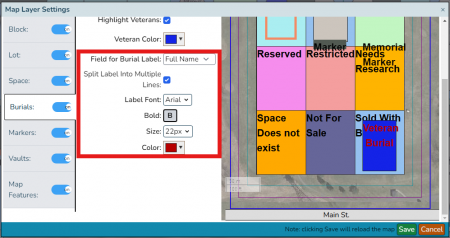
Click on the "Burials" tab and change the "Size" to make burial labels larger

