Difference between revisions of "Map appearance"
| Line 7: | Line 7: | ||
[[Map appearance#Veteran burials|Veteran burials]] | [[Map appearance#Veteran burials|Veteran burials]] | ||
[[Map appearance#Space colors & labels|Space colors & labels]] | |||
[[Map appearance#Making text larger|Making text larger]] | [[Map appearance#Making text larger|Making text larger]] | ||
| Line 13: | Line 15: | ||
The map appearance is controlled by the "Layers" popup. Click on your username in the top-right corner of your screen, then click "Layers". This will open a popup with several tabs along the left side. | The map appearance is controlled by the "Layers" popup. Click on your username in the top-right corner of your screen, then click "Layers". This will open a popup with several tabs along the left side. | ||
Each tab has an on/off switch. If you don't want to see vaults, or markers, simply click the on/off switch of its tab to "off", then click "Save" in the lower-right corner of the popup. | |||
{| class="wikitable" | |||
|+The map layers popup tabs | |||
!Tab name | |||
!Tab description | |||
|- | |||
|'''Map settings''' | |||
|Basic settings. Change the color of highlighted elements, show/hide flagged items, show/hide roads, etc. | |||
|- | |||
|'''Background''' | |||
|Choose to display a solid color, Google satellite image, Bing satellite image or orthophoto (drone photo) if your cemetery opted for a drone flight. | |||
|- | |||
|'''Section''' | |||
|Control the outline (width & color) and labelling of sections (font, bolding, size & color). | |||
Label options: Alias or individual ID. The alias is usually the same as the ID, some cemeteries may have a custom alias. | |||
|- | |||
|'''Block''' | |||
|Control the outline (width & color) and labelling of blocks (font, bolding, size & color). | |||
Label options: Alias, individual ID or full description. The alias is usually the same as the ID, some cemeteries may have a custom alias. The full description is a combination of the section and block id. | |||
|- | |||
|'''Lot''' | |||
|Your cemetery may not have lots. If it does, this tab lets you control the outline (width & color) and labelling of lots (font, bolding, size & color). | |||
Label options: Alias, individual ID or full description. The alias is usually the same as the ID, some cemeteries may have a custom alias. The full description is a combination of the section, block and lot id. | |||
|- | |||
|'''Space''' | |||
|Control the outline (width & color) and labelling of spaces (font, bolding, size & color). | |||
There are many label options. [[Map appearance#Space colors & labels|Read more below about changing space labelling & colors]]. | |||
|- | |||
|'''Burials''' | |||
|Control the outline (width & color), fill color and labelling of burials (font, bolding, size & color). | |||
Label options: None, full name or last name. | |||
Some names may be long; we recommend checking the checkbox next to "Split label into multiple lines". | |||
|- | |||
|'''Markers''' | |||
|Control the outline (width & color) and fill color of markers. | |||
If your cemetery uses memorial markers, you have options how to label them: None, full name or last name. You can also choose how those labels appear (font, bolding, size & color). [[Markers#Memorial markers|Read more about memorial markers on the Markers page]]. | |||
|- | |||
|'''Vaults''' | |||
|Choose the color vaults appear on your map. | |||
|- | |||
|'''Map features''' | |||
|Choose which, if any, map features you want to display on your map. | |||
Hiding a map feature does not remove it from the database. | |||
|} | |||
| Line 24: | Line 71: | ||
File:Layers example 2.png|This is the same exact section of cemetery, only this user has chosen to hide map features (such as the tree). The space colors have been changed and the names of burials are larger and bold. | File:Layers example 2.png|This is the same exact section of cemetery, only this user has chosen to hide map features (such as the tree). The space colors have been changed and the names of burials are larger and bold. | ||
File:Layers example 3.png|An extreme example of how dramatically we can change the appearance of the map. While we might not advise using this color scheme, you are absolutely free to do so! | File:Layers example 3.png|An extreme example of how dramatically we can change the appearance of the map. While we might not advise using this color scheme, you are absolutely free to do so! | ||
</gallery> | </gallery> | ||
== | == Space colors & labels== | ||
=== Space colors === | |||
[[File:Layers - how to change space colors 2.png|thumb|451x451px|Use the "Space" tab and click on the blocks of color next to the different space statuses to change map colors.]] | |||
*Click on the "Space" tab on the left side of the Layers popup, just above the "Burials" tab. | *Click on the "Space" tab on the left side of the Layers popup, just above the "Burials" tab. | ||
**Your tab may actually be called "Plot", "Grave", "Plat", or another term, depending on how your cemetery is set up. | **Your tab may actually be called "Plot", "Grave", "Plat", or another term, depending on how your cemetery is set up. | ||
| Line 32: | Line 81: | ||
*Click on the square of color next to each of your statuses. This will open a color picker, allowing you to change the color of the status. | *Click on the square of color next to each of your statuses. This will open a color picker, allowing you to change the color of the status. | ||
* Remember to click "Save" when you are happy with your changes! | * Remember to click "Save" when you are happy with your changes! | ||
=== Space labels === | |||
There are many ways to label spaces! Our most popular choices are "owner last name" and "Owner + space id". | |||
{| class="wikitable" | |||
|+Options to label spaces | |||
!Option name | |||
!Description | |||
|- | |||
|'''None''' | |||
|Do you hate labels? This is the option for you! | |||
|- | |||
|'''Space ID''' | |||
|Examples: ''8_B_30_A, Old section_4_East'' | |||
A concatenation of the space's section, block, lot and space name/number. | |||
|- | |||
|'''Owner full name''' | |||
|Example: ''Smith, Lorna Jones'' | |||
A concatenation of the primary owner's last name, first name and middle name. | |||
|- | |||
|'''Owner last name''' | |||
|Example: ''Smith'' | |||
Owner's last name. | |||
|- | |||
|'''Alias''' | |||
|Example: ''A, 45'' | |||
In most cemeteries, this is the same as the space name or number. | |||
|- | |||
|'''Status''' | |||
|Examples: ''Available, Sold with burial'' | |||
The space's status. | |||
|- | |||
|'''Cost''' | |||
|Examples: ''0, 1200'' | |||
The space's cost. | |||
|- | |||
|'''Owner + space ID''' | |||
| | |||
{| class="wikitable" | |||
|+ | |||
|''Smith, Lorna Jones'' | |||
''8_B_30_A'' | |||
|''Patel, Priyanka'' | |||
''Old section_4_East'' | |||
|} | |||
Displays on 2 lines: Line 1 is the owner's full name (last, first and middle). Line 2 is the space's id (a concatenation of the space's section, block, lot and space name/number). | |||
|- | |||
|'''Owner + alias''' | |||
|Displays on 2 lines: Line 1 is the owner's full name (last, first and middle). Line 2 is the space's alias, which is usually the same as the space name or number. | |||
|- | |||
|'''Permission + alias''' | |||
|Displays on 2 lines: Line 1 is the full name of the burial permission (last, first and middle). Line 2 is the space's alias, which is usually the same as the space name or number. [[Burials#Burial permissions|Learn more about burial permissions on the Burials page]]. | |||
|- | |||
|'''Permission + space ID''' | |||
|Displays on 2 lines: Line 1 is the full name of the burial permission (last, first and middle). Line 2 is the space's space's id (a concatenation of the space's section, block, lot and space name/number). [[Burials#Burial permissions|Learn more about burial permissions on the Burials page]]. | |||
|} | |||
<div style="clear:both;"></div> | <div style="clear:both;"></div> | ||
==Veteran burials== | ==Veteran burials== | ||
You can choose to make veteran burials a different color from non-veteran burials. In the Layers popup, click on the "Burials" tab on the left side. Click the checkbox next to "Highlight veterans" so that it is checked. Next, choose the color you would like veteran burials to show as by clicking on the square next to "Veteran color". Remember to click save! | [[File:The Burials tab of the Layers popup.png|thumb|Circled in red is the "Burials" tab. Within this tab, click the checkbox next to "Highlight veterans" and then choose a color you would like veteran burials to show as on your map.|452x452px]]You can choose to make veteran burials a different color from non-veteran burials. In the Layers popup, click on the "Burials" tab on the left side. Click the checkbox next to "Highlight veterans" so that it is checked. Next, choose the color you would like veteran burials to show as by clicking on the square next to "Veteran color". Remember to click save! | ||
[[File:Burials showing veterans in blue.png|center|thumb|300x300px|Here we can see 2 veteran burials in blue and 3 non-veteran burials in grey.]] | [[File:Burials showing veterans in blue.png|center|thumb|300x300px|Here we can see 2 veteran burials in blue and 3 non-veteran burials in grey.]] | ||
<div style="clear:both;"></div> | <div style="clear:both;"></div> | ||
== Changing how spaces are labelled == | |||
== Making text larger== | == Making text larger== | ||
Revision as of 20:30, 18 March 2025

CIMS allows for extensive customization of your map's appearance. Change space colors, text sizes and colors, fonts, marker and burial colors, and much more.
Map appearance basics
The map appearance is controlled by the "Layers" popup. Click on your username in the top-right corner of your screen, then click "Layers". This will open a popup with several tabs along the left side.
Each tab has an on/off switch. If you don't want to see vaults, or markers, simply click the on/off switch of its tab to "off", then click "Save" in the lower-right corner of the popup.
| Tab name | Tab description |
|---|---|
| Map settings | Basic settings. Change the color of highlighted elements, show/hide flagged items, show/hide roads, etc. |
| Background | Choose to display a solid color, Google satellite image, Bing satellite image or orthophoto (drone photo) if your cemetery opted for a drone flight. |
| Section | Control the outline (width & color) and labelling of sections (font, bolding, size & color).
Label options: Alias or individual ID. The alias is usually the same as the ID, some cemeteries may have a custom alias. |
| Block | Control the outline (width & color) and labelling of blocks (font, bolding, size & color).
Label options: Alias, individual ID or full description. The alias is usually the same as the ID, some cemeteries may have a custom alias. The full description is a combination of the section and block id. |
| Lot | Your cemetery may not have lots. If it does, this tab lets you control the outline (width & color) and labelling of lots (font, bolding, size & color).
Label options: Alias, individual ID or full description. The alias is usually the same as the ID, some cemeteries may have a custom alias. The full description is a combination of the section, block and lot id. |
| Space | Control the outline (width & color) and labelling of spaces (font, bolding, size & color).
There are many label options. Read more below about changing space labelling & colors. |
| Burials | Control the outline (width & color), fill color and labelling of burials (font, bolding, size & color).
Label options: None, full name or last name. Some names may be long; we recommend checking the checkbox next to "Split label into multiple lines". |
| Markers | Control the outline (width & color) and fill color of markers.
If your cemetery uses memorial markers, you have options how to label them: None, full name or last name. You can also choose how those labels appear (font, bolding, size & color). Read more about memorial markers on the Markers page. |
| Vaults | Choose the color vaults appear on your map. |
| Map features | Choose which, if any, map features you want to display on your map.
Hiding a map feature does not remove it from the database. |
Examples of different map appearances
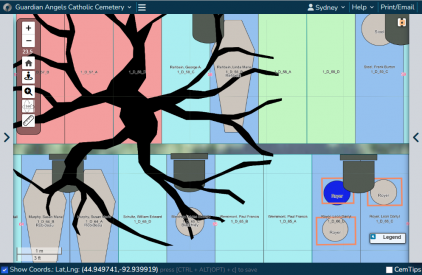
The default layers settings will show veteran burials in blue and non-veteran burials in grey. Seen in the above cemetery is a tree to the left (in black), several headstones (in dark grey), and a few vaults (salmon rectangles in the bottom-right).
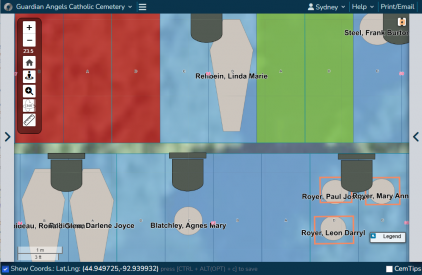
This is the same exact section of cemetery, only this user has chosen to hide map features (such as the tree). The space colors have been changed and the names of burials are larger and bold.
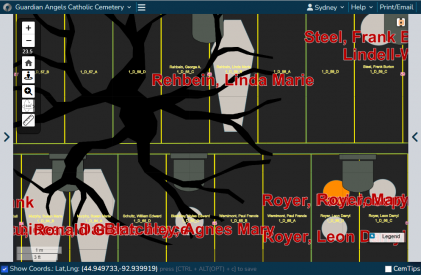
An extreme example of how dramatically we can change the appearance of the map. While we might not advise using this color scheme, you are absolutely free to do so!


Space colors & labels
Space colors

- Click on the "Space" tab on the left side of the Layers popup, just above the "Burials" tab.
- Your tab may actually be called "Plot", "Grave", "Plat", or another term, depending on how your cemetery is set up.
- Choose to color spaces by status or by type. The recommended setting is status.
- Click on the square of color next to each of your statuses. This will open a color picker, allowing you to change the color of the status.
- Remember to click "Save" when you are happy with your changes!
Space labels
There are many ways to label spaces! Our most popular choices are "owner last name" and "Owner + space id".
| Option name | Description | ||
|---|---|---|---|
| None | Do you hate labels? This is the option for you! | ||
| Space ID | Examples: 8_B_30_A, Old section_4_East
A concatenation of the space's section, block, lot and space name/number. | ||
| Owner full name | Example: Smith, Lorna Jones
A concatenation of the primary owner's last name, first name and middle name. | ||
| Owner last name | Example: Smith
Owner's last name. | ||
| Alias | Example: A, 45
In most cemeteries, this is the same as the space name or number. | ||
| Status | Examples: Available, Sold with burial
The space's status. | ||
| Cost | Examples: 0, 1200
The space's cost. | ||
| Owner + space ID |
| ||
| Owner + alias | Displays on 2 lines: Line 1 is the owner's full name (last, first and middle). Line 2 is the space's alias, which is usually the same as the space name or number. | ||
| Permission + alias | Displays on 2 lines: Line 1 is the full name of the burial permission (last, first and middle). Line 2 is the space's alias, which is usually the same as the space name or number. Learn more about burial permissions on the Burials page. | ||
| Permission + space ID | Displays on 2 lines: Line 1 is the full name of the burial permission (last, first and middle). Line 2 is the space's space's id (a concatenation of the space's section, block, lot and space name/number). Learn more about burial permissions on the Burials page. |
Veteran burials

You can choose to make veteran burials a different color from non-veteran burials. In the Layers popup, click on the "Burials" tab on the left side. Click the checkbox next to "Highlight veterans" so that it is checked. Next, choose the color you would like veteran burials to show as by clicking on the square next to "Veteran color". Remember to click save!

Changing how spaces are labelled
Making text larger
To make text larger, there are 2 places we need to change the text settings:
- Space tab
- Click on the "Space" tab. Scroll down and you will see options to control how spaces are labelled (common choices are "Owner last name" and "Space ID").
- Your tab may actually be called "Plot", "Grave", "Plat", or another term, depending on how your cemetery is set up.
- To make the text larger, find the "Size" dropdown and choose a larger size, such as 20px. You may also want to make the text bold by clicking the "B" next to the "Bold" label.
- Other options you can change include the text font and color.
- Click on the "Space" tab. Scroll down and you will see options to control how spaces are labelled (common choices are "Owner last name" and "Space ID").
- Burials tab
- Click on the "Burials" tab. Scroll down and you will see options to control how burials are labelled (clients often choose "Full name").
- Beneath the burial label are options to control the text appearance. To make the text larger, find the "Size" dropdown and choose a larger size.
- You can also change to the color, font, and text bolding, just like with spaces.
Click "Save", then close the Layers popup to see your map appearance changes.
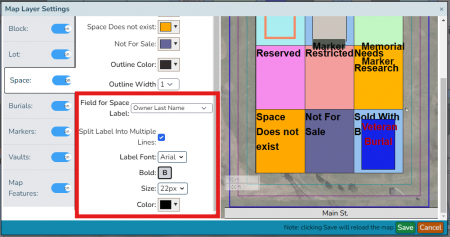
Click on the "Space" tab and change the "Size" to make space labels larger
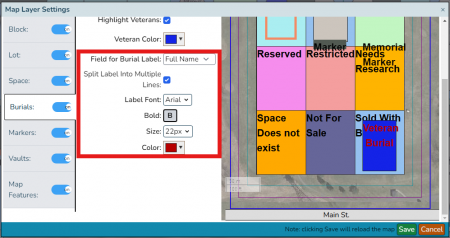
Click on the "Burials" tab and change the "Size" to make burial labels larger

