Difference between revisions of "Map features"
| Line 1: | Line 1: | ||
You may want to display trees, benches, fire hydrants and other objects visually on your CIMS map. This is what map features are for! | You may want to display trees, benches, fire hydrants and other objects visually on your CIMS map. This is what map features are for! CIMS also offers the ability to place temporary map markers. | ||
[[Map features#Map features basics|Map features basics]] | [[Map features#Map features basics|Map features basics]] | ||
| Line 10: | Line 10: | ||
[[Map features#Add media|Editing a map feature]] | [[Map features#Add media|Editing a map feature]] | ||
[[Map features#Temporary map markers|Temporary map markers]] | |||
<br><br> | <br><br> | ||
| Line 15: | Line 17: | ||
*In the top navigation bar, click "Utilities". From the dropdown, click "New map feature". | *In the top navigation bar, click "Utilities". From the dropdown, click "New map feature". | ||
*Your default map feature shape will appear on the map. Use the options in the right-hand flyout to change the feature shape, color, size and rotation. Change the position of the map feature using controls in the right-hand flyout or simply clicking on the map. Select a feature type from the dropdown, then click "Save". | *Your default map feature shape will appear on the map. Use the options in the right-hand flyout to change the feature shape, color, size and rotation. Change the position of the map feature using controls in the right-hand flyout or simply clicking on the map. Select a feature type from the dropdown, then click "Save". | ||
**Don't see the feature type you'd like to use as an option in the dropdown? Click the navy plus button to the right of the dropdown to open a popup that will allow you to add a new feature type. | **Don't see the feature type you'd like to use as an option in the dropdown? Click the navy plus button to the right of the dropdown to open a popup that will allow you to add a new feature type. | ||
Your map feature has been saved to the database and will appear on your map! | Your map feature has been saved to the database and will appear on your map! | ||
<br><gallery widths="375" heights="280"> | <br><gallery widths="375" heights="280"> | ||
File:Map features 1.png|To add a new map feature, click "Map features" from the navigation bar, then "New map feature". | File:Map features 1.png|To add a new map feature, click "Map features" from the navigation bar, then "New map feature". | ||
| Line 26: | Line 29: | ||
<div style="clear:both;"></div> | <div style="clear:both;"></div> | ||
==Edit a map feature== | ==Edit a map feature == | ||
To edit a map feature, first click on it on the map to load its information in the right-hand flyout. | To edit a map feature, first click on it on the map to load its information in the right-hand flyout. | ||
| Line 37: | Line 40: | ||
<br><br><div style="clear:both;"></div> | <br><br><div style="clear:both;"></div> | ||
==Add media== | == Add media== | ||
[[File:Map feature with media.png|thumb|600x600px|This map feature has media attached to it, namely, a photo of the tree it represents.]] | [[File:Map feature with media.png|thumb|600x600px|This map feature has media attached to it, namely, a photo of the tree it represents.]] | ||
Just like with spaces, burials, markers and more, you can choose to add media to a map feature. Click on the map feature on your map to load its information in the right-hand flyout. Scroll down to the Feature media section and click the navy "Add media" button. Upload a file or use your device's camera to take an image, then click "Save". | Just like with spaces, burials, markers and more, you can choose to add media to a map feature. Click on the map feature on your map to load its information in the right-hand flyout. Scroll down to the Feature media section and click the navy "Add media" button. Upload a file or use your device's camera to take an image, then click "Save". | ||
<br><br><div style="clear:both;"></div> | |||
==Temporary map markers== | |||
Temporary map markers allow you to place markers that disappear the next time you refresh your webpage. These markers appear only to you, not to others who may be using CIMS at the same time on their own devices. Temporary map markers are useful when saving or emailing screenshots of CIMS. | |||
Follow these steps to place and edit a temporary map marker: | |||
* Click "Utilities" in the top navigation bar, then "Add Temporary Map Marker". | |||
* A map marker will appear in the middle of your screen. Click and drag on its lower point to move it. | |||
* The latitude and longitude of the marker can be copied to your device's clipboard | |||
* Notes may be added in the text box below the latitude and longitude. | |||
* To remove a marker, click the "X" in the top-right corner. | |||
* From here, you may want to take a screenshot of your temporary map markers, or use the built-in feature to [[Print or email screenshots|print or email screenshots.]] | |||
<gallery widths="340" heights="220"> | |||
File:Adding a temporary map marker, step 1.png|First, click "Add temporary map marker". | |||
File:Adding a temporary map marker, step 2.png|To move the marker, click and drag the lower triangular part of the marker. | |||
File:Adding a temporary map marker, step 3.png|Copy the latitude and longitude using the button that looks like two pieces of paper. | |||
File:Adding a temporary map marker, step 4.png|Add an optional note. | |||
File:Adding a temporary map marker, step 5.png|Remove the marker by clicking the "X" button. | |||
</gallery> | |||
[[File:Built-in print-email functionality example.png|center|thumb|778x778px|Using CIMS's built-in print/email functionality, you can send or save images of these temporary map markers to others.]] | |||
Revision as of 22:05, 8 January 2026
You may want to display trees, benches, fire hydrants and other objects visually on your CIMS map. This is what map features are for! CIMS also offers the ability to place temporary map markers.
Add a map feature
- In the top navigation bar, click "Utilities". From the dropdown, click "New map feature".
- Your default map feature shape will appear on the map. Use the options in the right-hand flyout to change the feature shape, color, size and rotation. Change the position of the map feature using controls in the right-hand flyout or simply clicking on the map. Select a feature type from the dropdown, then click "Save".
- Don't see the feature type you'd like to use as an option in the dropdown? Click the navy plus button to the right of the dropdown to open a popup that will allow you to add a new feature type.
Your map feature has been saved to the database and will appear on your map!
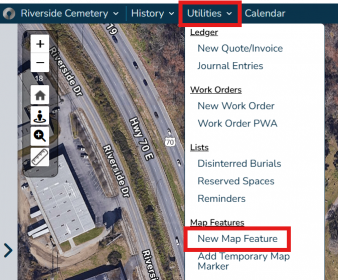
To add a new map feature, click "Map features" from the navigation bar, then "New map feature".
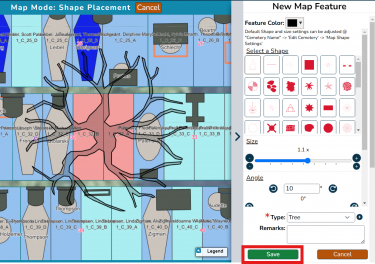
Customize your map feature, including changing the color, shape, size, position and rotation. Choose a type (in the above case, it's a tree), then click "Save".
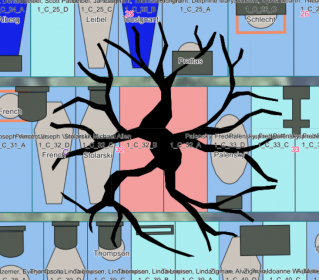
Your map feature will appear as a solid shape on your map! In this case, the tree shape helps us understand why two of our spaces are marked as restricted.


Edit a map feature
To edit a map feature, first click on it on the map to load its information in the right-hand flyout.
Edit a feature's shape, including its color, position and rotation, by clicking the navy "Edit feature shape" button near the top of the flyout. Edit other fields associated with the map feature by clicking on the fields in question, making your changes, and clicking "Update".
Delete a map feature
To delete a map feature, first click on it on the map to load its information in the right-hand flyout. Click the red "Remove" button, then click "Ok" to confirm. The map feature will shortly disappear from your map.
Add media

Just like with spaces, burials, markers and more, you can choose to add media to a map feature. Click on the map feature on your map to load its information in the right-hand flyout. Scroll down to the Feature media section and click the navy "Add media" button. Upload a file or use your device's camera to take an image, then click "Save".
Temporary map markers
Temporary map markers allow you to place markers that disappear the next time you refresh your webpage. These markers appear only to you, not to others who may be using CIMS at the same time on their own devices. Temporary map markers are useful when saving or emailing screenshots of CIMS.
Follow these steps to place and edit a temporary map marker:
- Click "Utilities" in the top navigation bar, then "Add Temporary Map Marker".
- A map marker will appear in the middle of your screen. Click and drag on its lower point to move it.
- The latitude and longitude of the marker can be copied to your device's clipboard
- Notes may be added in the text box below the latitude and longitude.
- To remove a marker, click the "X" in the top-right corner.
- From here, you may want to take a screenshot of your temporary map markers, or use the built-in feature to print or email screenshots.
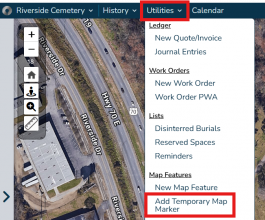
First, click "Add temporary map marker".
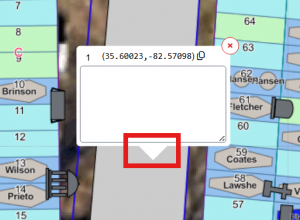
To move the marker, click and drag the lower triangular part of the marker.
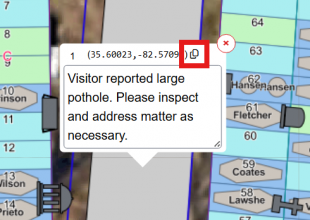
Copy the latitude and longitude using the button that looks like two pieces of paper.
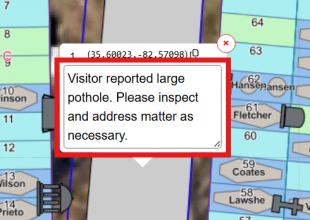
Add an optional note.
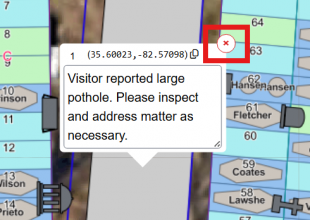
Remove the marker by clicking the "X" button.


