Difference between revisions of "Customers"
| (42 intermediate revisions by the same user not shown) | |||
| Line 1: | Line 1: | ||
[[Customers#Customer basics|Customer basics]] | |||
[[Customers#Avoiding duplicate customer records|Avoiding duplicate customer records]] | |||
[[ | |||
[[Customers#Creating a customer record|Creating a customer record]] | |||
[[ | [[Customers#Editing a customer record|Editing a customer record]] | ||
[[Customers#Recording a date of death|Recording a date of death]] | |||
[[Customers#Marking a customer as a veteran|Marking a customer as a veteran]] | |||
[[ | |||
# | |||
[[Customers#Searching for customers|Searching for customers]] | |||
[[Customers#Merging customer records|Merging customer records]] | |||
[[Customers#Customer contacts|Customer contacts]] | |||
# | |||
= | [[Customers#Companies as customers|Companies as customers]] | ||
# click the red | |||
<br> | |||
[[File:Customer records illustration.jpg|thumb|490x490px|Each person who interacts with your cemetery should have a customer record. They might be a space owner, cemetery employee, marker vendor, or even an interred pet.]] | |||
==Customer basics== | |||
===Who is a customer?=== | |||
A "customer" is anyone that has any dealings with your cemetery. A customer may have paid you for a space or services. A customer may also be an interred person, cemetery employee, vendor contact, next-of-kin, and so on. If your cemetery allows pet burials, a customer might even be a dog! | |||
Anyone you want to be able to track names, address, contact information, veteran information, living or deceased status, etc. should be entered as a "customer" of your cemetery. | |||
===What is a customer record?=== | |||
When you save a customer in CIMS, it creates a customer record. Ideally, we want a 1:1 ratio of one customer record per customer. This way, we can show the same person's activity with a cemetery over time; we can show when they purchased a space, when they authorized a burial, when they were in turn interred, and so on. When a mistake is made and a customer ends up with multiple customer records, you can merge records ([[Customers#Merging customer records|see below]]). | |||
===What about married couples?=== | |||
For couples, each partner should have their own customer record, for a total of 2 records per couple. | |||
<span style="border:2px solid #f2f2ce;padding:10px;border-radius:5px;background-color:#ffffeb;margin:15px 0px;display:inline-block;"><span style="display:flex;gap:10px;align-items: center"><span style="font-size: 24px">🎬</span><span>'''Watch a video!''' [https://youtu.be/ufTOCnWYvVw Customers & customer records]</span></span></span> | |||
<br> | |||
<br><br> | |||
==Avoiding duplicate customer records== | |||
[[File:Multiple customer records for one individual should be avoided.jpg|thumb|300x300px|A person should only have one customer record. Look how unhappy this person is with 3 customer records!]] | |||
Do not create duplicate customer records! This is when one individual has multiple customer records. Let's talk about how to avoid this common problem. | |||
Crucial vocabulary: '''Last name lookup field'''. A last name lookup field is any field in CIMS where you save a customer's name. These always have the placeholder text of "search by last name". Last name lookup fields are found in the ownership tab when entering owner or co-owner names, in the burial tab when entering the name of the interred person, in the marker tab for entering the marker purchaser's name, and so many other places. | |||
Every single time you are entering in a customer's name in one of these last name lookup fields, '''search for their last name before creating a new customer record'''. Type in the last name and a list of results will appear. If the name of the person appears in this list, click it. | |||
<br><br> | |||
<gallery widths="420" heights="250"> | |||
File:An example of a last name lookup field.png|All last name lookup fields have the placeholder text "search by last name" | |||
File:Last name lookup pt 1.png|Start typing in the last name of the person you are looking for. A list of matches appears below, in orange. | |||
File:Search for a customer before adding them to your database.png|Only create a new customer record when you are certain that the person doesn't already exist in your database! | |||
</gallery><div style="clear:both;"></div> | |||
==Creating a customer record== | |||
[[File:The add new customer button.png|thumb|Outlined in red is the "Add new" customer button. '''Note that we have searched for the last name in our database first!''']] | |||
There are 2 main ways to create a customer record: | |||
#'''From the Search tab''' | |||
#*Open the left-hand flyout and click on the "Search" tab. Choose the type "Customers". Click on the green "New customer" button. | |||
#'''From a "last name lookup" field''' | |||
#* | |||
#*First, search for the customer by starting to type in their last name. If you do not see their name appear in the orange box below, click the navy blue "Add new" button. | |||
Next, a popup will appear. The only fields that are required to create a customer record are the first and last names. If you have it, we recommend filling in the birth date so as to avoid confusion if someone else in the cemetery has the same name. When you have filled in the information you would like, click "Create" in the lower-right corner of the popup. | |||
<span style="border:2px solid #f2f2ce;padding:10px;border-radius:5px;background-color:#ffffeb;margin:15px 0px;display:inline-block;"><span style="display:flex;gap:10px;align-items: center"><span style="font-size: 24px">🎬</span><span>'''Watch a video!''' [https://youtu.be/ufTOCnWYvVw?t=77 Creating a customer record]</span></span></span> | |||
<div style="clear:both;"></div> | |||
<br><br> | |||
==Editing a customer record== | |||
[[File:Open a customer record from a last name lookup field.png|frame|Click the blue '''i''' button next to a name to open their customer record ]] | |||
First, find your customer record. There are 2 main ways to do this: | |||
#Use the [[Searching#The most useful search: Customer searches|customer search]] | |||
# Next to a last name lookup field, click the blue '''i''' button next to a name of the person whose record you would like to edit. | |||
A popup will open with their information. Make any changes you would like, then click "Update" in the lower-right corner of the popup to save them. | |||
To delete a customer record, click the red "Delete" button in the lower-left corner of the popup. | |||
<span style="border:2px solid #f2f2ce;padding:10px;border-radius:5px;background-color:#ffffeb;margin:15px 0px;display:inline-block;"><span style="display:flex;gap:10px;align-items: center"><span style="font-size: 24px">🎬</span><span>'''Watch a video!''' [https://youtu.be/ufTOCnWYvVw?t=309 Editing a customer record]</span></span></span> | |||
===Changing a customer's name=== | |||
Be careful when changing the name of a customer record! It may have unintended consequences. When in doubt, create a new customer record. | |||
If a customer's name genuinely did change, such as a change of name with marriage, proceed. Likewise, if the name has a typo, correct it. | |||
Many cemeteries have "Unknown, Unknown" customer records that own many spaces. This is often done when we import data for you and it is unclear who owns a space. If your cemetery needs to add an owner to a space owned by "Unknown, Unknown", make a new customer record instead of changing the name. | |||
<span style="border:2px solid #c2dce9;padding:10px;border-radius:5px;background-color:#f2fbff;margin:15px 0px;display:inline-block;">Think twice before changing the name of a customer!</span> | |||
<div style="clear:both;"></div> | |||
<br><br> | |||
==Recording a date of death== | |||
[[File:Deceased section of a customer record.png|thumb|551x551px|Enter in a customer's date of death in the "Deceased" section.]] | |||
To record a person's date of death in CIMS, you will need to specify it in their customer record. This is different from the date of burial, which can be found in the "Burial" tab of the right-hand flyout. | |||
To record a date of death, first, open their customer record (read the above [[Customers#Editing a customer record|editing a customer record]] to learn how to find customer records). Scroll down to the "Deceased" section and fill in the "Death date" field. Click the green "Update" button if you are updating a customer record, or the green "Create" button if this is a new one. | |||
<div style="clear:both;"></div> | |||
<br><br> | |||
==Marking a customer as a veteran== | |||
[[File:Customer record veteran information.png|thumb|543x543px|Veteran information can be found at the bottom of a customer's information. A checked "Veteran" checkbox indicates that this customer is a veteran.]] | |||
To indicate that a customer is a veteran, you will first need to open their customer record (read the above [[Customers#Editing a customer record|editing a customer record]] to learn how to find customer records). | |||
Scroll down to the bottom of their customer information to the "Veteran" section. Click the checkbox next to "Veteran" to mark this person as a veteran. Other fields, like the war they were in, their branch of service, rank, etc., are all optional. Click the green "Update" button if you are updating a customer record, or the green "Create" button if this is a new one. | |||
<div style="clear:both;"></div> | |||
<br><br> | |||
==Searching for customers== | |||
Searching for customers can easily be done in the left-hand flyout, where we have a tab dedicated to searching not just for customers, but also for deeds, spaces, and more. See [[Searching#The most useful search: Customer searches|the Search page]] for more information. | |||
<div style="clear:both;"></div> | |||
<br><br> | |||
== Merging customer records== | |||
Sometimes, mistakes happen and one customer may end up with multiple customer records. Ideally, we want every customer to only have one customer record. To solve this problem, we need to merge customer records. | |||
==== To merge 2 customer records:==== | |||
*Open one of the customer records in question (it doesn't matter which you choose). | |||
*Click the navy blue "Merge with another record" button in the lower-left corner of the popup. | |||
*Enter the name of the customer record you want to merge this record with, then click "Search". Alternatively, you can search by their customer id, city, maiden name, and more. | |||
*From the list of results, click on the result you want to merge with. | |||
*A new popup will appear showing the information for each customer record. CIMS will automatically try to merge information, but make sure to look over the list and click on the information you want to keep. Information that will be kept in the merged customer record will be highlighted in green with a checked checkbox to the right. | |||
*When satisfied, click the navy "Merge" button in the lower-right corner of the popup. | |||
* That's it! Where previously you had two customer records, they are now merged into one. | |||
If you have a customer with many customer records, repeat the above steps as necessary. | |||
CIMS will not let you merge the customer records if both people are interred.<gallery widths="450" heights="200"> | |||
File:Merging customer records pt 1.png|Open one of the customer records you want to merge. Click "Merge with another record". | |||
File:Merging customer records pt 2.png|In the popup that appears, fill in the name of the other record you want to merge with. Click "Search". | |||
File:Merging customer records pt 3.png|In the list of results that appears, click on the one you want to merge with. | |||
File:Merging customer records pt 4.png|Another popup will appear. Choose the information you want your merged customer record to have, then click "Merge". In the above example, you can see that the first name spellings are different; we chose "Mary Lee" as the correct spelling by clicking the checkbox next to it. | |||
File:Merging customer records pt 5.png|As you can see, our merged customer record has the first name we chose to keep, Mary Lee. | |||
</gallery> | |||
<br><br> | |||
==Customer contacts== | |||
You might want to record relationships between customers, such as husband and wife, or parent and child. CIMS allows this with contacts in customer records. | |||
*First, open the record of the customer you want to add a contact to. | |||
*Click on the "Contacts" tab on the right side of the popup. | |||
*Search by last name for the name of the person you want to add as a contact. Click on the relevant result. If they don't exist in your database, you will need to [[Customers#Creating a customer record|create a new customer record]]. | |||
*Click the green "Add" button. | |||
*Next, fill in the relationships between these individuals. If a relationship is missing from the dropdown, use the navy blue plus button to add it to your database. | |||
** "NOK" is short for next-of-kin. You may wish to designate a contact as being a customer's next-of-kin. | |||
*Click "Save contact". | |||
*This contact now exists for both customer records. | |||
To edit contact relationships, click the blue pencil icon on the right side of the contact information. Make your changes and then click "Save contact". | |||
To delete a contact, click the pencil icon on the right side of the contact information. From the popup that appears, click "Remove".<gallery widths="450" heights="200"> | |||
File:Adding a contact pt 1.png|Click the "Contacts" tab and search by last name for the person you want to add as a contact. Click their name from the list of results, then click "Add". | |||
File:Adding a contact pt 1.5.png|Fill in the relationships of these customers, then click "Save contact" | |||
File:Adding a contact pt 2.png|Saved contacts will appear in a list | |||
</gallery> | |||
<br><br> | |||
==Companies as customers== | |||
[[File:Customer records for companies.png|thumb|560x560px|Creating customer records for companies.]] | |||
CIMS allows you to add companies as customers. A company might be a third-party vendor or a trust fund. You could also use this feature more generally when you need to add a generic customer record, like "Williams family" when you know a family owns a space, but aren't sure which member specifically owns it. If your cemetery has spaces owned by a county or governmental organization, you could create a company called "Henderson County", or "Hudson Township", or so on. | |||
By default, when creating a customer record it is set as an "Individual". Just click "Company/group" and a new field asking for the company name will appear. A contact first and last name is required. | |||
Now when selling a space (or any other place that asks for a name input), you can search for this company name. | |||
[[File:Company name showing in database.png|center|thumb|364x364px|Here we see a company record, "Williams Family Trust", showing as an option when searching customers in our database.]] | |||
Latest revision as of 16:50, 30 June 2026
Avoiding duplicate customer records
Marking a customer as a veteran

Customer basics
Who is a customer?
A "customer" is anyone that has any dealings with your cemetery. A customer may have paid you for a space or services. A customer may also be an interred person, cemetery employee, vendor contact, next-of-kin, and so on. If your cemetery allows pet burials, a customer might even be a dog!
Anyone you want to be able to track names, address, contact information, veteran information, living or deceased status, etc. should be entered as a "customer" of your cemetery.
What is a customer record?
When you save a customer in CIMS, it creates a customer record. Ideally, we want a 1:1 ratio of one customer record per customer. This way, we can show the same person's activity with a cemetery over time; we can show when they purchased a space, when they authorized a burial, when they were in turn interred, and so on. When a mistake is made and a customer ends up with multiple customer records, you can merge records (see below).
What about married couples?
For couples, each partner should have their own customer record, for a total of 2 records per couple.
🎬Watch a video! Customers & customer records
Avoiding duplicate customer records

Do not create duplicate customer records! This is when one individual has multiple customer records. Let's talk about how to avoid this common problem.
Crucial vocabulary: Last name lookup field. A last name lookup field is any field in CIMS where you save a customer's name. These always have the placeholder text of "search by last name". Last name lookup fields are found in the ownership tab when entering owner or co-owner names, in the burial tab when entering the name of the interred person, in the marker tab for entering the marker purchaser's name, and so many other places.
Every single time you are entering in a customer's name in one of these last name lookup fields, search for their last name before creating a new customer record. Type in the last name and a list of results will appear. If the name of the person appears in this list, click it.
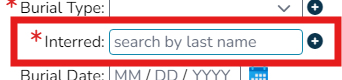
All last name lookup fields have the placeholder text "search by last name"
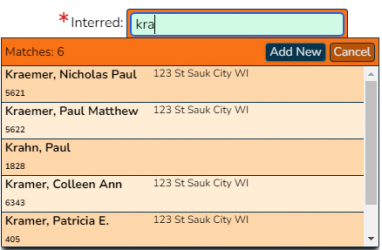
Start typing in the last name of the person you are looking for. A list of matches appears below, in orange.
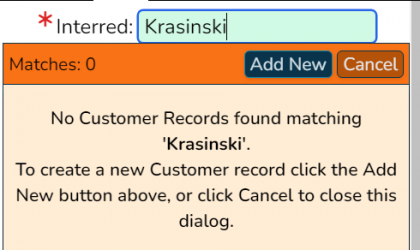
Only create a new customer record when you are certain that the person doesn't already exist in your database!


Creating a customer record

There are 2 main ways to create a customer record:
- From the Search tab
- Open the left-hand flyout and click on the "Search" tab. Choose the type "Customers". Click on the green "New customer" button.
- From a "last name lookup" field
- First, search for the customer by starting to type in their last name. If you do not see their name appear in the orange box below, click the navy blue "Add new" button.
Next, a popup will appear. The only fields that are required to create a customer record are the first and last names. If you have it, we recommend filling in the birth date so as to avoid confusion if someone else in the cemetery has the same name. When you have filled in the information you would like, click "Create" in the lower-right corner of the popup.
🎬Watch a video! Creating a customer record
Editing a customer record

First, find your customer record. There are 2 main ways to do this:
- Use the customer search
- Next to a last name lookup field, click the blue i button next to a name of the person whose record you would like to edit.
A popup will open with their information. Make any changes you would like, then click "Update" in the lower-right corner of the popup to save them.
To delete a customer record, click the red "Delete" button in the lower-left corner of the popup.
🎬Watch a video! Editing a customer record
Changing a customer's name
Be careful when changing the name of a customer record! It may have unintended consequences. When in doubt, create a new customer record.
If a customer's name genuinely did change, such as a change of name with marriage, proceed. Likewise, if the name has a typo, correct it.
Many cemeteries have "Unknown, Unknown" customer records that own many spaces. This is often done when we import data for you and it is unclear who owns a space. If your cemetery needs to add an owner to a space owned by "Unknown, Unknown", make a new customer record instead of changing the name.
Think twice before changing the name of a customer!
Recording a date of death

To record a person's date of death in CIMS, you will need to specify it in their customer record. This is different from the date of burial, which can be found in the "Burial" tab of the right-hand flyout.
To record a date of death, first, open their customer record (read the above editing a customer record to learn how to find customer records). Scroll down to the "Deceased" section and fill in the "Death date" field. Click the green "Update" button if you are updating a customer record, or the green "Create" button if this is a new one.
Marking a customer as a veteran

To indicate that a customer is a veteran, you will first need to open their customer record (read the above editing a customer record to learn how to find customer records).
Scroll down to the bottom of their customer information to the "Veteran" section. Click the checkbox next to "Veteran" to mark this person as a veteran. Other fields, like the war they were in, their branch of service, rank, etc., are all optional. Click the green "Update" button if you are updating a customer record, or the green "Create" button if this is a new one.
Searching for customers
Searching for customers can easily be done in the left-hand flyout, where we have a tab dedicated to searching not just for customers, but also for deeds, spaces, and more. See the Search page for more information.
Merging customer records
Sometimes, mistakes happen and one customer may end up with multiple customer records. Ideally, we want every customer to only have one customer record. To solve this problem, we need to merge customer records.
To merge 2 customer records:
- Open one of the customer records in question (it doesn't matter which you choose).
- Click the navy blue "Merge with another record" button in the lower-left corner of the popup.
- Enter the name of the customer record you want to merge this record with, then click "Search". Alternatively, you can search by their customer id, city, maiden name, and more.
- From the list of results, click on the result you want to merge with.
- A new popup will appear showing the information for each customer record. CIMS will automatically try to merge information, but make sure to look over the list and click on the information you want to keep. Information that will be kept in the merged customer record will be highlighted in green with a checked checkbox to the right.
- When satisfied, click the navy "Merge" button in the lower-right corner of the popup.
- That's it! Where previously you had two customer records, they are now merged into one.
If you have a customer with many customer records, repeat the above steps as necessary.
CIMS will not let you merge the customer records if both people are interred.
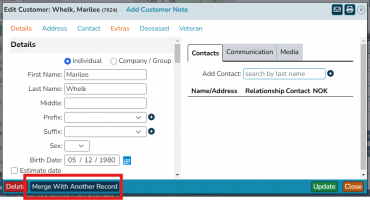
Open one of the customer records you want to merge. Click "Merge with another record".
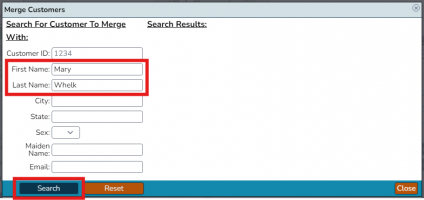
In the popup that appears, fill in the name of the other record you want to merge with. Click "Search".
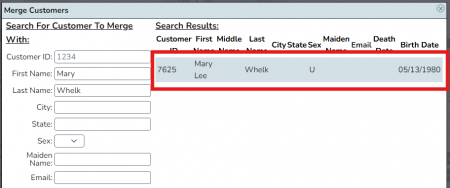
In the list of results that appears, click on the one you want to merge with.
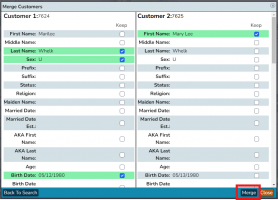
Another popup will appear. Choose the information you want your merged customer record to have, then click "Merge". In the above example, you can see that the first name spellings are different; we chose "Mary Lee" as the correct spelling by clicking the checkbox next to it.
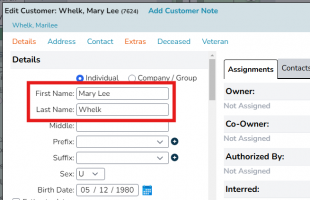
As you can see, our merged customer record has the first name we chose to keep, Mary Lee.


Customer contacts
You might want to record relationships between customers, such as husband and wife, or parent and child. CIMS allows this with contacts in customer records.
- First, open the record of the customer you want to add a contact to.
- Click on the "Contacts" tab on the right side of the popup.
- Search by last name for the name of the person you want to add as a contact. Click on the relevant result. If they don't exist in your database, you will need to create a new customer record.
- Click the green "Add" button.
- Next, fill in the relationships between these individuals. If a relationship is missing from the dropdown, use the navy blue plus button to add it to your database.
- "NOK" is short for next-of-kin. You may wish to designate a contact as being a customer's next-of-kin.
- Click "Save contact".
- This contact now exists for both customer records.
To edit contact relationships, click the blue pencil icon on the right side of the contact information. Make your changes and then click "Save contact".
To delete a contact, click the pencil icon on the right side of the contact information. From the popup that appears, click "Remove".
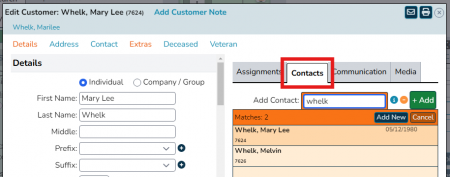
Click the "Contacts" tab and search by last name for the person you want to add as a contact. Click their name from the list of results, then click "Add".
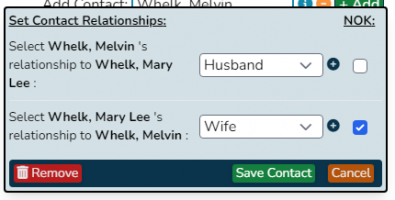
Fill in the relationships of these customers, then click "Save contact"
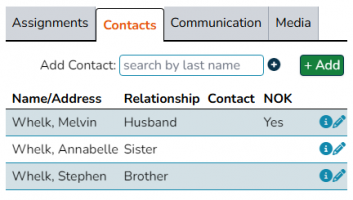
Saved contacts will appear in a list


Companies as customers

CIMS allows you to add companies as customers. A company might be a third-party vendor or a trust fund. You could also use this feature more generally when you need to add a generic customer record, like "Williams family" when you know a family owns a space, but aren't sure which member specifically owns it. If your cemetery has spaces owned by a county or governmental organization, you could create a company called "Henderson County", or "Hudson Township", or so on.
By default, when creating a customer record it is set as an "Individual". Just click "Company/group" and a new field asking for the company name will appear. A contact first and last name is required.
Now when selling a space (or any other place that asks for a name input), you can search for this company name.
