Difference between revisions of "Markers"
Jump to navigation
Jump to search
| Line 33: | Line 33: | ||
* That's it! Now the marker will show that it is associated with two spaces. | * That's it! Now the marker will show that it is associated with two spaces. | ||
<div style="clear:both;"></div> | <div style="clear:both;"></div> | ||
==Adding media to markers== | ==Adding media to markers== | ||
Revision as of 17:08, 3 March 2025
Attaching one marker to multiple spaces
Create a marker
- Navigate to the space where you want to add the marker, either by clicking on it from the map or opening the space in the right-hand flyout some other way. Click the Marker tab.
- Click the "Add new marker" button, then "Create new".
- A marker will appear on the map using your cemetery's default marker shape. The right-hand flyout will change to show different marker shapes available for you to choose. Click on a thumbnail image of a marker shape to change the shape. To move the marker on the map, click on the map directly or use the position buttons in the right-hand flyout. You can also change the shape's size and rotation in the right-hand flyout. Click "Next".
- The right-hand flyout will change to show fields where you can enter marker information. Only the marker type is required, other fields are optional.
- Need a marker type that isn't in the list? Click the navy blue plus button to add an option.
- Click "Save" to save this marker in your database.
- The map will update to show the marker, now a solid color, on your map.
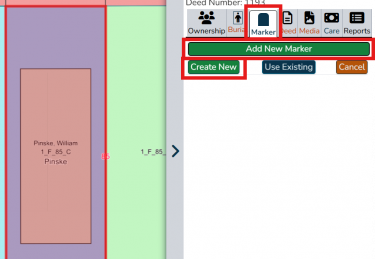
Add a new marker from the Marker tab. Click "Add new marker" then "Create new".
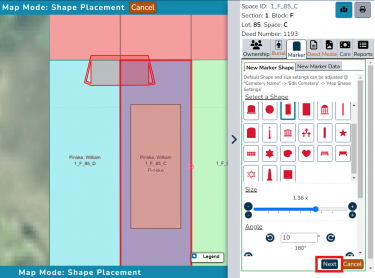
Modify the marker by changing the shape, size, placement and rotation. Click "Next".
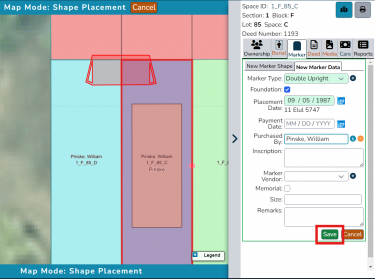
Add any relevant information about the marker, then click "Save".
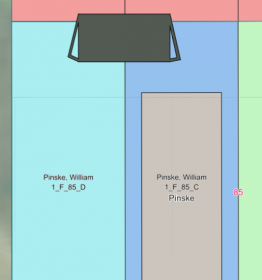
The newly-added marker will appear as a solid shape on your map.


Attaching one marker to multiple spaces

- Navigate to the space where you want to add the marker. Click the Marker tab, then "Add new marker". Click the navy blue "Use existing" button.
- Click the marker you want to attach to this space.
- That's it! Now the marker will show that it is associated with two spaces.