Difference between revisions of "Customers"
| Line 1: | Line 1: | ||
[[Customers#Customer basics|Customer basics]] | [[Customers#Customer basics|Customer basics]] | ||
[[Customers#Avoiding duplicate customer records|Avoiding duplicate customer records]] | |||
[[Customers#Creating a customer record|Creating a customer record]] | [[Customers#Creating a customer record|Creating a customer record]] | ||
[[Customers#Editing a customer record|Editing a customer record]] | |||
[[Customers#Searching for customers|Searching for customers]] | [[Customers#Searching for customers|Searching for customers]] | ||
| Line 11: | Line 15: | ||
<br> | <br> | ||
[[File:Customer records illustration.jpg|thumb|490x490px|Each person who interacts with your cemetery should have a customer record. They might be a space owner, marker vendor, or even an interred pet.]] | [[File:Customer records illustration.jpg|thumb|490x490px|Each person who interacts with your cemetery should have a customer record. They might be a space owner, cemetery employee, marker vendor, or even an interred pet.]] | ||
== Customer basics== | ==Customer basics== | ||
===Who is a customer?=== | ===Who is a customer?=== | ||
| Line 23: | Line 27: | ||
When you save a customer in CIMS, it creates a customer record. Ideally, we want a 1:1 ratio of one customer record per customer. This way, we can show the same person's activity with a cemetery over time; we can show when they purchased a space, when they authorized a burial, when they were in turn interred, and so on. When a mistake is made and a customer ends up with multiple customer records, you can merge records ([[Customers#Merging customer records|see below]]). | When you save a customer in CIMS, it creates a customer record. Ideally, we want a 1:1 ratio of one customer record per customer. This way, we can show the same person's activity with a cemetery over time; we can show when they purchased a space, when they authorized a burial, when they were in turn interred, and so on. When a mistake is made and a customer ends up with multiple customer records, you can merge records ([[Customers#Merging customer records|see below]]). | ||
=== What about married couples? === | ===What about married couples?=== | ||
For couples, each partner should have their own customer record, for a total of 2 records per couple.<br> | For couples, each partner should have their own customer record, for a total of 2 records per couple.<br> | ||
==Avoiding duplicate customer records== | |||
[[File:Multiple customer records for one individual should be avoided.jpg|thumb|300x300px|Multiple customer records for one individual should be avoided]] | |||
Avoid duplicate customer records! This is when one individual has multiple customer records. Let's talk about how to avoid this common problem. | |||
Crucial vocabulary: '''Last name lookup field'''. A last name lookup field is any field in CIMS where you save a customer's name. These always have the placeholder text of "search by last name". Last-name lookup fields are found in the ownership tab when entering owner or co-owner names, in the burial tab when entering the name of the interred person, in the marker tab for entering the marker purchaser's name, and so many other places. | |||
Every single time you are entering in a customer's name in one of these last name lookup fields, '''search for their last name before creating a new customer record'''. Type in the last name and a list of results will appear. If the name of the person appears in this list, click it. | |||
<gallery widths="420" heights="250"> | |||
File:An example of a last name lookup field.png|All last name lookup fields have the placeholder text "search by last name" | |||
File:Last name lookup pt 1.png|Start typing in the last name of the person you are looking for. A list of matches appears below, in orange. | |||
File:Search for a customer before adding them to your database.png|Only create a new customer record when you are certain that the person doesn't already exist in your database! | |||
</gallery><div style="clear:both;"></div> | |||
==Creating a customer record== | ==Creating a customer record== | ||
[[File:The add new customer button.png|thumb|Outlined in red is the "Add new" customer button. '''Note that we have searched for the last name in our database first!''']] | |||
There are 2 main ways to create a customer record: | There are 2 main ways to create a customer record: | ||
# '''From the Search tab''' | #'''From the Search tab''' | ||
#* Open the left-hand flyout and click on the "Search" tab. Choose the type "Customers". Click on the green "New customer" button. | #*Open the left-hand flyout and click on the "Search" tab. Choose the type "Customers". Click on the green "New customer" button. | ||
# '''From''' | #'''From a "last name lookup" field''' | ||
#* | |||
#* First, search for the customer by starting to type in their last name. If you do not see their name appear in the orange box below, click the navy blue "Add new" button. | |||
Next, a popup will appear. The only fields that are required to create a customer record are the first and last names. If you have it, we recommend filling in the birth date so as to avoid confusion if someone else in the cemetery has the same name. When you have filled in the information you would like, click "Create" in the lower-right corner of the popup. | |||
<div style="clear:both;"></div> | |||
== Editing a customer record== | |||
[[File:Open a customer record from a last name lookup field.png|frame|Click the blue '''i''' button next to a name to open their customer record ]] | |||
First, find your customer record. There are 2 main ways to do this: | |||
# Use the [[Searching#The most useful search: Customer searches|customer search]] | |||
# Next to a last name lookup field, click the blue '''i''' button next to a name of the person whose record you would like to edit. | |||
A popup will open with their information. Make any changes you would like, then click "Update" in the lower-right corner of the popup to save them. | |||
<div style="clear:both;"></div> | |||
==Searching for customers== | ==Searching for customers== | ||
Searching for customers can easily be done in the left-hand flyout, where we have a tab dedicated to searching not just for customers, but also for deeds, spaces, and more. See [[Searching#The most useful search: Customer searches|the Search page]] for more information. | Searching for customers can easily be done in the left-hand flyout, where we have a tab dedicated to searching not just for customers, but also for deeds, spaces, and more. See [[Searching#The most useful search: Customer searches|the Search page]] for more information. | ||
<div style="clear:both;"></div> | |||
< | |||
==Merging customer records== | ==Merging customer records== | ||
Sometimes, mistakes happen and one customer may end up with multiple customer records. Ideally, we want every customer to only have one customer record. To solve this problem, we need to merge customer records. | Sometimes, mistakes happen and one customer may end up with multiple customer records. Ideally, we want every customer to only have one customer record. To solve this problem, we need to merge customer records. | ||
<div style="clear:both;"></div> | |||
====To merge 2 customer records:==== | ====To merge 2 customer records:==== | ||
| Line 56: | Line 85: | ||
---- | ---- | ||
[[File:AddCustomer.PNG|200px|thumb|left|Add New Customer After Search]] | [[File:AddCustomer.PNG|200px|thumb|left|Add New Customer After Search]] | ||
[[File:CustoemrInfomation.PNG|200px|thumb|left|Customer Information window]] | [[File:CustoemrInfomation.PNG|200px|thumb|left|Customer Information window]] | ||
=Update= | =Update = | ||
To update a customers just click on any of the fields you wish to change and enter the new information. When you are done click the green "Update" button at the bottom (you may need to scroll down to see it depending on your screen size). | To update a customers just click on any of the fields you wish to change and enter the new information. When you are done click the green "Update" button at the bottom (you may need to scroll down to see it depending on your screen size). | ||
| Line 77: | Line 101: | ||
=Merge= | =Merge= | ||
[[File:CustomerMerge.PNG|200px|thumb|left|merging customers]] | [[File:CustomerMerge.PNG|200px|thumb|left|merging customers]] | ||
To Merge customers is to have one customer overwrite another (effectively deleting the second customer, while at the same time having the first customer take his/her place); | To Merge customers is to have one customer overwrite another (effectively deleting the second customer, while at the same time having the first customer take his/her place); | ||
#Open the customer information page for the customer you want to keep. | #Open the customer information page for the customer you want to keep. | ||
#Click the blue "Merge" button at the bottom of the page (you may need to scroll to see this) | #Click the blue "Merge" button at the bottom of the page (you may need to scroll to see this) | ||
##A customer search screen will open | ##A customer search screen will open | ||
###Search for the customer you want to be overwritten | ###Search for the customer you want to be overwritten | ||
### Click on the row the corresponds to the customer you want overwritten | ###Click on the row the corresponds to the customer you want overwritten | ||
###A merge customer screen will open and you will be able to choose what information you want to keep from each customer record | ###A merge customer screen will open and you will be able to choose what information you want to keep from each customer record | ||
###Click the green Merge button in the bottom right of the screen and select 'ok' on the confirmation pop up on top. | ###Click the green Merge button in the bottom right of the screen and select 'ok' on the confirmation pop up on top. | ||
| Line 95: | Line 119: | ||
#Click on the "Contact" tab just under the Customer's Name in the upper left | #Click on the "Contact" tab just under the Customer's Name in the upper left | ||
#Click on the blue "Add Contact" button | #Click on the blue "Add Contact" button | ||
## the customer search window will appear | ##the customer search window will appear | ||
###search for an existing customer | ###search for an existing customer | ||
###click the green "Add New" button to add a new customer as the contact | ###click the green "Add New" button to add a new customer as the contact | ||
##choose a relationship of the chosen/created customer to the original customer | ##choose a relationship of the chosen/created customer to the original customer | ||
##click the green "Save" buttonin the Relationship popup | ##click the green "Save" buttonin the Relationship popup | ||
### the contact information will appear in the list of contacts | ###the contact information will appear in the list of contacts | ||
#repeat step 3 for additional contacts OR click "Close" on the customer search popup. | #repeat step 3 for additional contacts OR click "Close" on the customer search popup. | ||
=Remove Contact= | =Remove Contact= | ||
#click the red trashcan icon to the right of the contact you wish to remove. | #click the red trashcan icon to the right of the contact you wish to remove. | ||
Revision as of 01:55, 16 February 2025
Avoiding duplicate customer records

Customer basics
Who is a customer?
A "customer" is anyone that has any dealings with your cemetery. A customer may have paid you for a space or services. A customer may also be an interred person, cemetery employee, vendor contact, next-of-kin, and so on. If your cemetery allows pet burials, a customer might even be a dog!
Anyone you want to be able to track names, address, contact information, veteran information, living or deceased status, etc. should be entered as a "customer" of your cemetery.
What is a customer record?
When you save a customer in CIMS, it creates a customer record. Ideally, we want a 1:1 ratio of one customer record per customer. This way, we can show the same person's activity with a cemetery over time; we can show when they purchased a space, when they authorized a burial, when they were in turn interred, and so on. When a mistake is made and a customer ends up with multiple customer records, you can merge records (see below).
What about married couples?
For couples, each partner should have their own customer record, for a total of 2 records per couple.
Avoiding duplicate customer records

Avoid duplicate customer records! This is when one individual has multiple customer records. Let's talk about how to avoid this common problem.
Crucial vocabulary: Last name lookup field. A last name lookup field is any field in CIMS where you save a customer's name. These always have the placeholder text of "search by last name". Last-name lookup fields are found in the ownership tab when entering owner or co-owner names, in the burial tab when entering the name of the interred person, in the marker tab for entering the marker purchaser's name, and so many other places.
Every single time you are entering in a customer's name in one of these last name lookup fields, search for their last name before creating a new customer record. Type in the last name and a list of results will appear. If the name of the person appears in this list, click it.
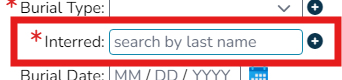
All last name lookup fields have the placeholder text "search by last name"
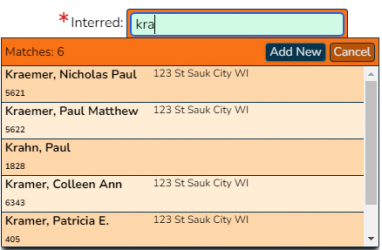
Start typing in the last name of the person you are looking for. A list of matches appears below, in orange.
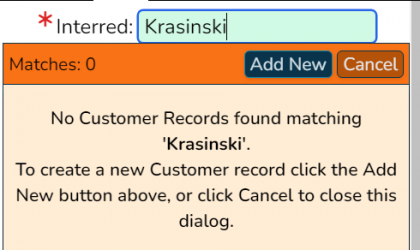
Only create a new customer record when you are certain that the person doesn't already exist in your database!


Creating a customer record

There are 2 main ways to create a customer record:
- From the Search tab
- Open the left-hand flyout and click on the "Search" tab. Choose the type "Customers". Click on the green "New customer" button.
- From a "last name lookup" field
- First, search for the customer by starting to type in their last name. If you do not see their name appear in the orange box below, click the navy blue "Add new" button.
Next, a popup will appear. The only fields that are required to create a customer record are the first and last names. If you have it, we recommend filling in the birth date so as to avoid confusion if someone else in the cemetery has the same name. When you have filled in the information you would like, click "Create" in the lower-right corner of the popup.
Editing a customer record

First, find your customer record. There are 2 main ways to do this:
- Use the customer search
- Next to a last name lookup field, click the blue i button next to a name of the person whose record you would like to edit.
A popup will open with their information. Make any changes you would like, then click "Update" in the lower-right corner of the popup to save them.
Searching for customers
Searching for customers can easily be done in the left-hand flyout, where we have a tab dedicated to searching not just for customers, but also for deeds, spaces, and more. See the Search page for more information.
Merging customer records
Sometimes, mistakes happen and one customer may end up with multiple customer records. Ideally, we want every customer to only have one customer record. To solve this problem, we need to merge customer records.
To merge 2 customer records:
- Coming soon!
If you have a customer with many customer records, repeat the above steps as necessary.
Customer contacts
Coming soon!
Outdated documentation below


Update
To update a customers just click on any of the fields you wish to change and enter the new information. When you are done click the green "Update" button at the bottom (you may need to scroll down to see it depending on your screen size).
Remove
To remove a customer:
- Open that Customer's information page of the customer you want to remove
- Click on the red "Delete" button at the bottom of the Customer's Information page.
- Answer yes to the confirmation popup
- After the customers has been deleted you will be sent back to teh main Customers page.
Merge

To Merge customers is to have one customer overwrite another (effectively deleting the second customer, while at the same time having the first customer take his/her place);
- Open the customer information page for the customer you want to keep.
- Click the blue "Merge" button at the bottom of the page (you may need to scroll to see this)
- A customer search screen will open
- Search for the customer you want to be overwritten
- Click on the row the corresponds to the customer you want overwritten
- A merge customer screen will open and you will be able to choose what information you want to keep from each customer record
- Click the green Merge button in the bottom right of the screen and select 'ok' on the confirmation pop up on top.
- A customer search screen will open
The customer merge window will close and the Customer search Information page will reload.
IF both the first and second customers are interred (buried) then the merge will not occur as this will result in the first customer being interred in more than one place.
Add Contact
To add a contact (such as a Next Of Kin):
- Open the Customer Information screen
- Click on the "Contact" tab just under the Customer's Name in the upper left
- Click on the blue "Add Contact" button
- the customer search window will appear
- search for an existing customer
- click the green "Add New" button to add a new customer as the contact
- choose a relationship of the chosen/created customer to the original customer
- click the green "Save" buttonin the Relationship popup
- the contact information will appear in the list of contacts
- the customer search window will appear
- repeat step 3 for additional contacts OR click "Close" on the customer search popup.
Remove Contact
- click the red trashcan icon to the right of the contact you wish to remove.