|
|
| (15 intermediate revisions by the same user not shown) |
| Line 1: |
Line 1: |
| [[File:Main Page Overview.png|alt=CIMS Main Map Overview|thumb|650x650px|CIMS Map]] | | [[Navigating CIMS Professional#Map basics|Map basics: zooming, panning & more]] |
|
| |
|
| == Map ==
| | [[Navigating CIMS Professional#Showing latitude & longitude|Showing latitude & longitude]] |
| The map of your cemetery uses the same mapping technology as Google maps. Each map consists of different zoom levels, each containing several dozen image tiles that are generated on the fly as you load your cemetery. In addition, there is an interactive layer that highlights spaces, burials, markers and map features as you move your mouse over the cemetery map.
| |
| [[File:MapNavigationPane.PNG|200px|thumb|left|Map Navigation Pane]] | |
| === Zooming ===
| |
| Just like with google maps you can zoom using the following methods:
| |
| ==== Scroll wheel ====
| |
| Pushing the scroll wheel up to zoom in, and pushing the scroll wheel back to zoom out.
| |
|
| |
|
| ==== +/- buttons ====
| | [[Navigating CIMS Professional#CemTips|CemTips]] |
| Clicking the + or - buttons in the upper left in the "Navigation pane" will zoom you in and out one level
| |
| ==== Magnifier click and drag button ====
| |
| Click on the magnifier icon in the "Navigation pane" and then click and drag a rectangle on the map and the map will zoom in to size of the rectangle drawn
| |
| ==== Pinch and zoom (on mobile devices) ====
| |
| Mobile devices such as tables and smartphones with touch screens are supported and using the normal Pinch and zoom techniques will zoom the map in and out.
| |
| === Pan ===
| |
| To pan the map simply click and drag the map, or on mobile devices tap and drag.
| |
| [[File:homeButton.PNG|left]] | |
| === Home Button ===
| |
| Clicking this will bring you back to your maps starting point when you fist loaded CIMS.
| |
|
| |
|
| <br clear=all>
| | [[Navigating CIMS Professional#Interactive map elements|Interactive map elements]] |
| [[File:CompassButton.PNG|left]] | |
|
| |
|
| === Compass icon === | | <span style="border:2px solid #f2f2ce;padding:10px;border-radius:5px;background-color:#ffffeb;margin:15px 0px;display:inline-block;"><span style="display:flex;gap:10px;align-items: center"><span style="font-size: 24px">🎬</span><span>'''Watch a video!''' [https://youtu.be/t_kCOf_pD2E Understanding the CIMS Professional interface]</span></span></span> |
| Clicking this will ask you if you want to share your geo-location information with CIMS. If you answer yes then if your location is within 5 miles of the Cemetery a blue dot will be placed on the map representing your location.
| |
|
| |
|
| <br clear=all>
| |
| [[File:RulerButton.PNG|left]]
| |
|
| |
|
| [[File:Distance.PNG|100px|thumb|right|Measurement tool]] | | [[File:Main Page Overview.png|alt=CIMS Main Map Overview|thumb|580x580px|An example of a CIMS Professional map]] |
|
| |
|
| === Ruler icon === | | ==Map basics== |
| If you want to get a measurement between 2 points click this icon and then click on two points on the map. You can click and drag each point to edit your measurement. You can also switch between Feet and Meters on the bottom of your map. This option will only show when you use the measurement tool. Click the icon again to turn off the measurement tool.<br clear="all">
| | The map of your cemetery uses the same mapping technology as Google maps. As you zoom in, greater levels of detail will appear. As spaces and individual burials become visible, they will become interactive; clicking on them opens the right-hand flyout to show more information. |
| [[File:MapOverview.PNG|200px|thumb|left|Overview Map]] | | [[File:MapNavigationPane.PNG|200px|thumb|left|Map Navigation Pane]] |
| | ===Zooming=== |
| | There are several ways to zoom the map: |
| | ====Scroll wheel on your mouse ==== |
| | Push the scroll wheel on your mouse up to zoom in and push the scroll wheel back to zoom out. |
|
| |
|
| === Overview Map === | | ====+/- buttons ==== |
| The Overview map show a red rectangle over the are of the cemetery you have zoomed into.
| | Clicking the + or - buttons in the map controls will zoom you in and out. Map controls can be found in the upper-left corner of your map. |
| | ====Magnifier click-and-drag button ==== |
| | Click on the magnifier icon in the map controls and then click and drag a rectangle on the map to zoom in to selected area. |
| | ====Pinch and zoom (on mobile devices)==== |
| | Mobile devices such as tables and smartphones with touch screens are supported and using the normal pinch and zoom techniques will zoom the map in and out. |
|
| |
|
| <br clear=all>
| | ===Pan=== |
| [[File:MapLegend.PNG|200px|thumb|left|Overview Map]]
| | To pan the map simply click and drag the map, or on mobile devices tap and drag. |
| === Map Legend === | |
| The Legend is a quick reference for the different types of spaces your cemetery has. Each type of space can have a unique color associated to it. These colors are set in the Layers settings found by clicking on the "Layers" menu item in the top navigation bar: Then click on the "Layer Legends" tab and in the Layer drop down choose "Spaces"; pick your colors then click on "OK".
| |
| | |
| <br clear=all>
| |
| [[File:MapShowCoords.PNG|200px|thumb|left|The "Show Coords" checkbox with latitude & longitude showing]]
| |
| [[File:MapSavedCoords.PNG|200px|thumb|left|The "Saved coordinates" popup]]
| |
| == Show Coords ==
| |
| To see the latitude and longitude of specific spot on your cemetery, click the check box in the lower left to "Show Coords". You will then see the coordinates appear to the right of the "Show Coords" label. Move the mouse around your cemetery and you will see the latitude and longitude update with your mouse movements. To get a more accurate measurement, zoom in as much as you can. | |
| | |
| '''Hidden feature:''' Pressing CTRL+ALT+c will save the current set of latitude and longitude to a popup window to make copy and pasting much easier. Each time you press Ctrl+Alt+c the new set of latitude and longitude are added to the "Saved Coords" list.
| |
| | |
| | |
| <br clear=all>
| |
| [[File:MapCIMStip3.PNG|200px|thumb|left|CIMS CemTips]]
| |
| [[File:CimTips4.PNG|200px|thumb|right|CemTips burial name]]
| |
| | |
| == CemTips ==
| |
| Overly busy maps can be counterproductive. To combat this we have implemented "CemTips" which allow a user selectable set of information about a map item to be displayed when you place your mouse over the item. To turn on CemTips, click the check box next to "CemTips" in the lower right corner of CIMS. To adjust what is shown on mouse hover, click on "CemTip Settings". In the setting popup choose the map items you want CemTips to display for, and what type of information should be shown.[[File:Cemtips5.PNG|640px|thumb|right|CemTips burial name]]
| |
| | |
| The options are:
| |
| *Ownership
| |
| **Status
| |
| **Cost
| |
| **Perimeter
| |
| **Space ID
| |
| **Owner Name
| |
| **Ownership Info
| |
| *Burial
| |
| **Interred
| |
| **Burial Date
| |
| **Burial ID
| |
| **Burial Info
| |
| *Marker
| |
| **Inscription
| |
| **Placement Date
| |
| **Marker Cost
| |
| **Marker Size
| |
| **Marker ID
| |
| *Features
| |
| **Feature Remarks
| |
| | |
| ''Users on slower internet connections may see a delay in how fast CemTips appear.''
| |
| <br clear=all>
| |
| | |
| == Clicking/tapping map elements ==
| |
| Various elements on the map are interactive and clicking/tapping on them will open up additional windows.
| |
| [[File:LfoChevron.PNG|left]]
| |
| === Left Fly-out bar ===
| |
| Clicking the "Left fly-out" chevron "'''>'''" will open the "Left fly-out" menu where you can easily navigate to a space, run searches or generate reports.
| |
| | |
| <br clear=all>
| |
| [[File:space.PNG|left]]
| |
| | |
| === Space ===
| |
| Clicking on a space will open the r[[Space information|ight fly out]] menu to the "Ownership" tab and display that space's ownership information
| |
| <br clear=all>
| |
| [[File:Burial.PNG|left]]
| |
| | |
| === Burial ===
| |
| Click on a burial will open the r[[Space information|ight fly out]] menu to the "Burials" tab and display that space's burial information
| |
| <br clear=all>
| |
| [[File:Marker.PNG|left]]
| |
| | |
| === Marker ===
| |
| Click on a marker will open the r[[Space information|ight fly out]] menu to the "Markers" tab and display that space's marker information
| |
| <br clear=all>
| |
| [[File:Maus.PNG|left]]
| |
| === Mausoleum ===
| |
| [[File:Mausoleum.PNG|200px|thumb|Mausoleum view|left]]
| |
| [[File:Back2Main.PNG|right]]
| |
| Clicking on a mausoleum will change the map to show that mausoleum's spaces. Each of those spaces can then be clicked to open the [[Space information|Right fly out]] with additional information. When viewing a mausoleum, a "Back to main map" button will appear in the navigation pane in the upper-right corner of the map. Clicking this button returns you the main map.
| |
| | |
| <br clear=all>
| |
| [[File:MapHistory.PNG|200px|thumb|left|"History" dropdown]]
| |
| | |
| === Map history ===
| |
| Every space you click on in the map will be added to the map history list. Click on "History" in the top navigation bar of CIMS. Clicking on a space ID in the history list will pan/zoom the map to that space and load that space's information into the r[[Space information|ight fly out]].
| |
|
| |
|
| <br clear=all>
| | ===Other map controls=== |
| | {| class="wikitable" |
| | ! |
| | ! |
| | |- |
| | |[[File:homeButton.PNG|left]] |
| | |'''Home button''' |
|
| |
|
| == Left Fly-out ==
| | Clicking the home button will re-center your map on your cemetery. The map will show the same location and zoom as when you first logged into CIMS. |
| [[File:LfoListOpen.PNG|200px|thumb|left|Left Fly-out Section Listing]]
| | |- |
| "Fly-outs" are used to maximize the space for the map by providing information panels that can be hidden by CIMS users. By only revealing what is in the fly-outs only at the time those features are needed/requested, we are able to make a smoother, more efficient workflow. Inside the "left fly-out" you will find the "List", "Search" and "Reports" tabs.
| | |[[File:CompassButton.PNG|left]] |
| === List tab ===
| | |'''Compass button''' |
| ==== Open/Close sections, block, lots ====
| |
| Click on the links in the left listing to open/close the sub-lists. In the image to the left the Section "Cem 1" was clicked to reveal all the Blocks assigned to the section. Then Block "Block A" was clicked to reveal all the lots assigned to that block. Then lot "Lot 2" was clicked to reveal all the spaces assigned to that lot. Clicking on a space will pan/zoom the map to the space and open the [[Space information|Right Fly Out]] with that space's information
| |
| ==== Search By Space ID ====
| |
| Each space has its own unique "Space ID". This id consists of a concatenation of the Section, Block, Lot, and Space name combined with an '_' (underscore). For example for space A shown in the image on the left the Space ID woudl be "1_A_2_A". If you type in the Space ID into the "Search By Space Id" input box found at the top of the Cemetery section list and click the magnifier button to the right of the input box (and that is a proper Space Id) that map will pan/zoom to that space and open the [[Space information|Right Fly Out]] with that space's information.
| |
| ==== Space Status Counts ====
| |
| Each section in the Left Flyout list will have a stats button that when clicked, will show the counts for all the space statuses for that section. Each Sub level will show its respective space status counts as well. You can turn this on and off by clicking the Status Counts Button.[[File:SpaceStatusButton.PNG|50px|top|Status Counts Button]]
| |
| [[File:QuickGlanceAvailability.PNG|200px|thumb|left|Space Status Counts]] | |
| <br clear=all>
| |
|
| |
|
| === Search ===
| | Use the compass button to display your position on the map relative to your cemetery. You need to be within 5 miles of your cemetery to use this function. |
| Searching is used to find: owners, co-owners, spaces (single or groups), burials, markers, deeds, space permissions, work orders, ownership history, Customers, and Map Features. Search results can also be printed or downloaded to Excel, so if you wanted a list of all available spaces for a specific lot, just choose the section, block and lot, then only have the "Available" option checked and click the blue "Search" button at the bottom of the Left Fly-out.
| |
| [[File:LfoSearchSpace.PNG|200px|thumb|left|Left Fly-out Searching]]
| |
| ==== Space ====
| |
| Space searching allows for filtering by:
| |
| * Section
| |
| * Block
| |
| * Lot
| |
| * Space
| |
| * Space status
| |
| ** Available
| |
| ** Sold
| |
| ** Sold with Burial
| |
| ** Reserved
| |
| ** Restricted
| |
| ** Any special status you may have added in the Cemetery Settings
| |
| * Owner/Co-Owner
| |
| ** First name
| |
| ** Last names
| |
| ** Name searching will search for any match of the letters entered; for example 'smith' will match 'smith', 'smitherson', and 'blacksmith', but not 'smit'
| |
| ** to do an exact match click on the check box to the right of the first or last name. This 'smith' willonly match 'smith' and not 'blacksmith'
| |
| * Remarks
| |
| * Space Types
| |
| * Sold Dates
| |
| ** equaling to
| |
| ** between
| |
| ** before
| |
| ** after
| |
| *Cost
| |
| ** equaling
| |
| ** between
| |
| ** more than
| |
| ** less than
| |
| *Any Custom Fields Created
| |
| Clicking the blue "Search" will run the search using the parameters filled out and then display the results in a grid in the search results popup. Each match space is listed as a row. Clicking on the row will pan/zoom the map to that space and load that space's information in the [[Space information|Right Fly Out]].
| |
| [[File:SearchBuial.PNG|200px|thumb|left|Searching Burials]]
| |
|
| |
|
| ==== Burial ====
| | Click on the compass icon and grant permission for CIMS to use your geolocation information. A blue dot will then appear on your map showing where you are located. |
| Change the type Drop-down to show "Burials" and you will see the search filtering times update to those available for searching burials:
| | |- |
| * Section
| | |[[File:RulerButton.PNG|left]] |
| * Block
| | |'''Ruler tool''' |
| * Lot
| |
| * Space
| |
| * Burial name
| |
| ** First Name
| |
| ** Last Name
| |
| ** Use the "Exact Match" check box for exact name matching
| |
| * Death Date
| |
| ** equal to
| |
| ** between
| |
| ** before
| |
| ** after
| |
| * Cause Of Death
| |
| * Remarks
| |
| * Veteran
| |
| * Relationship to space owner
| |
| * Burial type
| |
| * Funeral Home
| |
| * Vault Type
| |
| * Burial Date
| |
| ** equal to
| |
| ** between
| |
| ** before
| |
| ** after
| |
| * Any custom burial fields created
| |
|
| |
|
| <br clear=all> | | The ruler tool will allow you to measure the distance between 2 points on your map. Click the button, then click on your map in 2 different locations; you will see measurements of distance display. Click the button again to turn off your measurements. |
| [[File:SearchMarker.PNG|200px|thumb|left|Searching Markers]]
| | |} |
| | <br clear="all"> |
|
| |
|
| ==== Markers ==== | | ==Showing latitude & longitude== |
| Set the Search Type to "Markers" and use the following to filter a markers search
| | [[File:CIMS show coordinates checkbox.png|The "Show Coords" checkbox with latitude & longitude showing|frame]] |
| * Section
| | To see the latitude and longitude of specific point in your cemetery, click the "Show Coords" checkbox in the lower left corner of CIMS. You will then see coordinates appear just to the right; move the mouse around your cemetery and you will see the latitude and longitude update with your mouse movements. Zoom in to get a more accurate measurement. |
| * Block
| |
| * Lot
| |
| * Space
| |
| * Inscription on the marker
| |
| ** use the "Exact Match" check box to run a exact inscription match
| |
| * Whether it has a foundation or not
| |
| * Marker Type
| |
| * Marker Vendor
| |
| * Cost
| |
| ** equal to
| |
| ** between
| |
| ** less than
| |
| ** greater than
| |
| * Placement Date
| |
| ** equal to
| |
| ** between
| |
| ** before
| |
| ** after
| |
| * Payment Date
| |
| ** equal to
| |
| ** between
| |
| ** before
| |
| ** after
| |
| * Any custom marker fields created
| |
|
| |
|
| <br clear=all>
| | ===Saving map coordinates=== |
| [[File:SearchDeeds.PNG|200px|thumb|left|Searching Markers]] | | [[File:MapSavedCoords.PNG|thumb|This "Saved coordinates" popup has several sets of coordinates saved]] |
| | Pressing CTRL+ALT+c will save the current set of latitude and longitude to a popup window to make copy and pasting much easier. Each time you press Ctrl+Alt+c, the new set of latitude and longitude are added to the "Saved Coords" list. |
|
| |
|
| ==== Deeds ====
| |
| With a search type of "Deeds" you can filter on the following:
| |
| * Section
| |
| * Block
| |
| * Lot
| |
| * Space
| |
| ** First Name
| |
| ** Last name
| |
| *Deed Number
| |
| *Need
| |
| *Transfer date
| |
| ** equal to
| |
| ** between
| |
| ** before
| |
| ** after
| |
| * Deed Date
| |
| ** equal to
| |
| ** between
| |
| ** before
| |
| ** after
| |
| *Deed Cost
| |
| ** equal to
| |
| ** between
| |
| ** less than
| |
| ** greater than
| |
|
| |
|
| <br clear=all>
| |
| [[File:SearchPermission.PNG|200px|thumb|left|Searching Markers]]
| |
|
| |
|
| === Permission === | | <br clear="all"> |
| The Search type of "Permissions" has the following filters
| | [[File:MapCIMStip3.PNG|288x288px|thumb|CIMS CemTips activated]] |
| * Section
| | ==CemTips== |
| * Block
| | [[File:Cemtips5.PNG|313x313px|thumb|right|In the CemTips settings popup, you can choose what information to display when hovering over an interactive element]] |
| * Lot
| | Overly-busy maps can be counterproductive. To combat this we have implemented "CemTips", which display a quick summary of information about a map item when you hover over it with your mouse. |
| * Space
| |
| * Permissions
| |
| ** first name
| |
| ** last name
| |
| ** Use the "Exact Match check boxes to run an exact match on the names
| |
|
| |
|
| <br clear=all>
| | To turn on CemTips, click the check box next to "CemTips" in the lower-right corner of CIMS. To adjust what information is shown about a map item, click on "CemTip Settings", a button just to the right of the CemTips checkbox in the lower-right corner. If you do not see the settings button, make sure you have CemTips turned on. In the settings popup, choose the map items you want CemTips to display for and what type of information should be shown. |
| [[File:SearchWorkOrder.PNG|200px|thumb|left|Searching Markers]]
| |
| === Work Orders ===
| |
| This is where you can get a listing of Work Orders (for now). to filter the list of all work orders use the following:
| |
| * Section
| |
| * Block
| |
| * Lot
| |
| * Space
| |
| *Deceased
| |
| ** First name
| |
| ** Last name
| |
| ** use "Exact Match" checkbox to run an exact match on the names
| |
| * Remarks
| |
| *Work order Completion
| |
| ** All Work orders
| |
| ** Completed Work Orders
| |
| ** Incomplete Work Orders
| |
| *Priority
| |
| ** High
| |
| ** Medium
| |
| ** Low
| |
| * Completion Date
| |
| ** equal to
| |
| ** between
| |
| ** before
| |
| ** after
| |
| * Start Date
| |
| ** equal to
| |
| ** between
| |
| ** before
| |
| ** after
| |
| * Due Date
| |
| ** equal to
| |
| ** between
| |
| ** before
| |
| ** after
| |
|
| |
|
| <br clear=all>
| | For the most comprehensive overview, choose "Ownership info", "Burial info", and "Marker info". Remember to save your changes! |
| [[File:SearchOwnershipHistory.PNG|200px|thumb|left|Searching Markers]]
| |
|
| |
|
| === Ownership history === | | <span style="border:2px solid #c2dce9;padding:10px;border-radius:5px;background-color:#f2fbff;margin:15px 0px;display:inline-block;">Users on slower internet connections may see a delay in how fast CemTips appear.</span>[[File:CimTips4.PNG|With CemTips activated, hovering over a burial will display a summary of its information|frame|center]]<br clear="all"> |
| This search types uses the following filters:
| |
| * First Name
| |
| * Last Name
| |
| * Purchase Date
| |
| ** equal to
| |
| ** between
| |
| ** before
| |
| ** after
| |
| * Cost
| |
| ** equal to
| |
| ** between
| |
| ** less than
| |
| ** greater than
| |
| * Remarks
| |
|
| |
|
| <br clear=all>
| | ==Interactive map elements== |
| [[File:CustomersLeftFlyOut.PNG|200px|thumb|left|Searching Customers]] | | Various elements on the map are interactive and clicking or tapping on them will open up additional windows with information. |
| === Customers === | | {| class="wikitable" |
| This search types uses the following filters:
| | |+ |
| * Customer Type
| | ! |
| ** All
| | ! |
| ** Owners Only
| | |- |
| ** Deceased
| | |[[File:LfoChevron.PNG|left]] |
| ** Not Deceased
| | | |
| * Veteran Status
| | ===Left-hand and right-hand flyout bars=== |
| * Customer ID
| | The left- and right-hand flyouts are initially hidden when you login to CIMS. To expand these flyouts, click on the grey bar spanning the height of your screen on either the left- or right-hand side. These grey bars also have a navy blue chevron in the middle of them, indicating they are interactive and can be clicked on. |
| * First Name
| | |- |
| * Last Name
| | |[[File:space.PNG|left]] |
| * Maiden Name
| | | |
| * City
| | === Space=== |
| * State
| | Clicking on a space will open the right-hand flyout to the "Ownership" tab and display that space's ownership information. |
| * Email
| | |- |
| * Birth Date
| | |[[File:Burial.PNG|left|168x168px]] |
| ** equal to
| | | |
| ** between
| | ===Burial=== |
| ** before
| | Clicking on a burial will open the right-hand flyout to the "Burials" tab and display that space's burial information. |
| ** after
| | |- |
| * Death Date
| | |[[File:Marker.PNG|left|108x108px]] |
| ** equal to
| | | |
| ** between
| | ===Marker=== |
| ** before
| | Clicking on a marker will open the right-hand flyout to the "Markers" tab and display that space's marker information. |
| ** after
| | |- |
| * Any Custom Customer Fields Created
| | |[[File:Maus.PNG|left|thumb|115x115px|The initial view of a mausoleum]] |
| <br clear=all>
| | [[File:Mausoleum.PNG|200px|thumb|Mausoleum view when clicked on|left]] |
| | |[[File:Back2Main.PNG|frame|Clicking the "Back to main map" button will exit the mausoleum view]] |
|
| |
|
| === Search results === | | ===Mausoleum=== |
| [[File:SerchResultsGrid2.PNG|200px|thumb|left|Search Results Grid]]
| | Initially, a mausoleum on a CIMS Professional map will show a top-down view of its structure without further details. Clicking on a mausoleum will change the map to show that mausoleum's individual niches. Each of those niches can then be clicked to open the right-hand flyout with additional information. |
| The search results grid is a table that shows a row for every match made by your filtered search. If you leave a filter field blank then the search will match on any value including "NULL" (empty) values. For example in the image to the left Spaces were searched for ALL the spaces in ALL the lots of Block "A" in Section "1" that have a status of "Sold With Burial". From the search results we can see are 421 records that match the search filters. If there are more than 500 records those additional records will be shown on another page of results; there will be buttons to the other pages shown at the bottom of the results window.
| |
|
| |
|
| From here you can scroll up and down to look at the results (and sometimes left to right if there are more columns). You can click on a row and the result window will close and your map will zoom/pan to the row's corresponding space and the [[Space information|Right Fly Out]] will open with that space's information.
| |
|
| |
|
| There are 2 buttons at the top of the results window:
| | When viewing a mausoleum, a "Back to main map" button will appear in the map controls in the upper-left corner of the map. Clicking this button returns you the main map. |
| * Print
| | |} |
| *: This will print the complete (meaning all pages if more than one) using your browser's print dialog box. One of the reason we recommend the Chrome web browsers is it has a very nice print preview and the ability to adjust margins, landscape vs. portrait and other settings prior to printing.
| |
| * Download as CSV
| |
| *: a CSV is a Comma separated listing. This can be used to open in Excel, or be imported into another database.
| |
Map basics: zooming, panning & more
Showing latitude & longitude
CemTips
Interactive map elements
🎬Watch a video! Understanding the CIMS Professional interface
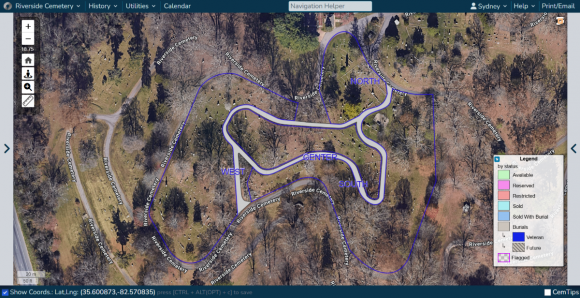
An example of a CIMS Professional map
Map basics
The map of your cemetery uses the same mapping technology as Google maps. As you zoom in, greater levels of detail will appear. As spaces and individual burials become visible, they will become interactive; clicking on them opens the right-hand flyout to show more information.
Zooming
There are several ways to zoom the map:
Scroll wheel on your mouse
Push the scroll wheel on your mouse up to zoom in and push the scroll wheel back to zoom out.
+/- buttons
Clicking the + or - buttons in the map controls will zoom you in and out. Map controls can be found in the upper-left corner of your map.
Magnifier click-and-drag button
Click on the magnifier icon in the map controls and then click and drag a rectangle on the map to zoom in to selected area.
Pinch and zoom (on mobile devices)
Mobile devices such as tables and smartphones with touch screens are supported and using the normal pinch and zoom techniques will zoom the map in and out.
Pan
To pan the map simply click and drag the map, or on mobile devices tap and drag.
Other map controls
|
|
|
|
|
Home button
Clicking the home button will re-center your map on your cemetery. The map will show the same location and zoom as when you first logged into CIMS.
|
|
|
Compass button
Use the compass button to display your position on the map relative to your cemetery. You need to be within 5 miles of your cemetery to use this function.
Click on the compass icon and grant permission for CIMS to use your geolocation information. A blue dot will then appear on your map showing where you are located.
|
|
|
Ruler tool
The ruler tool will allow you to measure the distance between 2 points on your map. Click the button, then click on your map in 2 different locations; you will see measurements of distance display. Click the button again to turn off your measurements.
|
Showing latitude & longitude
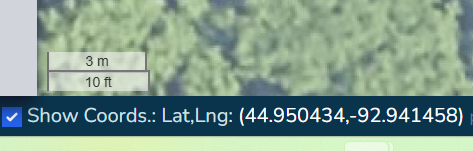
The "Show Coords" checkbox with latitude & longitude showing
To see the latitude and longitude of specific point in your cemetery, click the "Show Coords" checkbox in the lower left corner of CIMS. You will then see coordinates appear just to the right; move the mouse around your cemetery and you will see the latitude and longitude update with your mouse movements. Zoom in to get a more accurate measurement.
Saving map coordinates
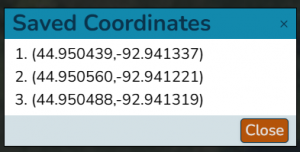
This "Saved coordinates" popup has several sets of coordinates saved
Pressing CTRL+ALT+c will save the current set of latitude and longitude to a popup window to make copy and pasting much easier. Each time you press Ctrl+Alt+c, the new set of latitude and longitude are added to the "Saved Coords" list.
CemTips
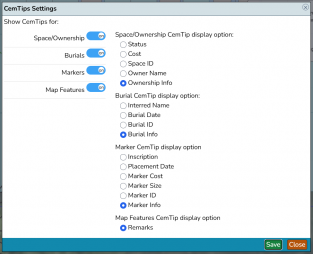
In the CemTips settings popup, you can choose what information to display when hovering over an interactive element
Overly-busy maps can be counterproductive. To combat this we have implemented "CemTips", which display a quick summary of information about a map item when you hover over it with your mouse.
To turn on CemTips, click the check box next to "CemTips" in the lower-right corner of CIMS. To adjust what information is shown about a map item, click on "CemTip Settings", a button just to the right of the CemTips checkbox in the lower-right corner. If you do not see the settings button, make sure you have CemTips turned on. In the settings popup, choose the map items you want CemTips to display for and what type of information should be shown.
For the most comprehensive overview, choose "Ownership info", "Burial info", and "Marker info". Remember to save your changes!
Users on slower internet connections may see a delay in how fast CemTips appear.
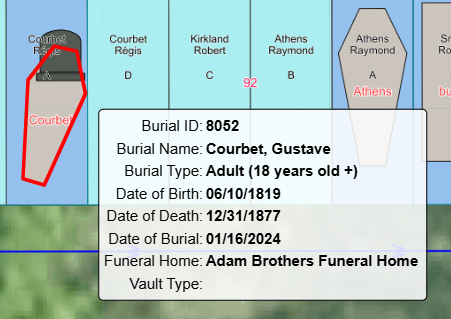
With CemTips activated, hovering over a burial will display a summary of its information
Interactive map elements
Various elements on the map are interactive and clicking or tapping on them will open up additional windows with information.
|
|
|
|
|
Left-hand and right-hand flyout bars
The left- and right-hand flyouts are initially hidden when you login to CIMS. To expand these flyouts, click on the grey bar spanning the height of your screen on either the left- or right-hand side. These grey bars also have a navy blue chevron in the middle of them, indicating they are interactive and can be clicked on.
|
|
|
Space
Clicking on a space will open the right-hand flyout to the "Ownership" tab and display that space's ownership information.
|
|
|
Burial
Clicking on a burial will open the right-hand flyout to the "Burials" tab and display that space's burial information.
|
|
|
Marker
Clicking on a marker will open the right-hand flyout to the "Markers" tab and display that space's marker information.
|
 The initial view of a mausoleum 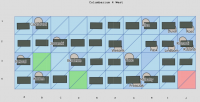 Mausoleum view when clicked on |
 Clicking the "Back to main map" button will exit the mausoleum view Mausoleum
Initially, a mausoleum on a CIMS Professional map will show a top-down view of its structure without further details. Clicking on a mausoleum will change the map to show that mausoleum's individual niches. Each of those niches can then be clicked to open the right-hand flyout with additional information.
When viewing a mausoleum, a "Back to main map" button will appear in the map controls in the upper-left corner of the map. Clicking this button returns you the main map.
|


